Search

Hotbox Hipster

a pittsburgh hippie chick's unbridled love for all things food related

Month

November 2012

a most creative pittsburgh pasta!

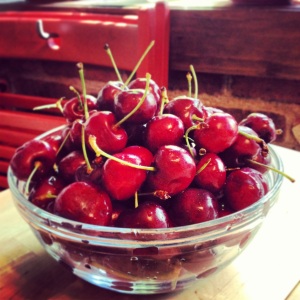
do you love keilbasa but never know what to do with it beyond a simple sandwich with some fried onions and peppers? with no disrespect to the pittsburgh fave keilbasa sammich… i offer up a more gourmet alternative for your linked buddy. this recipe is one that i made up one day when i realized how delicious keilbasa was cut thinly and fried in a skillet.  take heed: it shows some major restraint not to eat half the plate of the crispy little circles as you prep the rest of your meal… for real.  when you fry them up in some olive oil over hight heat… they take on an incredibly dark almost carmelized hue and become all crispy around the edges.  as i show you the before and after photo below, note the juice on the plate with the cooked pieces resulted from deglazing the pan with a generous amount of white wine. (i’ll explain later) reserving some of this liquid to add back in at end with cooked keilbasa adds amazing depth of flavor to the whole dish.

cut on a slight angle

and the after shot… what a fabulous transformation.

resist resist!!! whoa nelly good….

so here’s what i did to create this go to week night dinner.  dice up half of a large onion. set aside. slice your keilbasa on a slight diagonal- about a quarter inch thick. set aside. open a small can of diced tomatoes. place a half a bag of frozen peas in a cereal bowl and set aside. dice a colored bell pepper and set aside.  uncork a bottle of white wine (i used pinot grigio tonight). open a can of chicken broth- you will use less than half of it. open a small can of tomato paste. (you will use about two tablespoons) – ok here goes.  first thing- start a large pot of water boiling so that you can cook up a bag of wide egg noodles.   do a couple of swirls of olive oil in a stainless skillet. (if you use non stick, you will not get a lovely coating on the bottom to be able to deglaze- so opt for a steel pot or skillet) heat oil over md high heat. once hot, add your keilbasa. give your downsides a chance to darken up before stirring, but be careful not to burn it! stir, and continue cooking until you are satisfied w the color. (see above visual) remove from skillet to a plate and set aside. if there is a large amount of grease in skillet, dump into a safe vessel to trash it.  (can from your recyle bin) with skillet over medium heat, slowly and carefully add a generous pour of white wine to deglaze pan. stir to release brown bits from bottom of pan. add your diced onion, and cook for five minutes until some of the juice is absorbed by the onions. add your bell pepper, the tomato paste, the diced tomatoes, and the peas. stir. please add any herbs you love at this point. i added a generous pinch of dried thyme, a shake of garlic powder, a shake of dried oregano, a half a tsp of salt, a shake of red pepper flakes, and a go round of black pepper.

begin to add to your base of sauteed onions.
stir and simmer…

once you have all of these things in your pot and give it a stir, you will note it is a little thick. add a bit of chicken broth to give the ingredients something to simmer in.  i never measure… so maybe a cup??  add in your cooked keilbasa, stir again-  and simmer uncovered for fifteen minutes or so. add your drained and rinsed egg noodles back into the empty pot you cooked them in.  carefully pour your lovely creation onto the salted egg noodles and stir to combine.  serve up with a nice crusty  loaf of bread- or more simply with a single glass of white wine.  enjoy!!

finito!!

homefries. plain and simple.

the homefry.  i’ve finally unlocked it.  after using several different pans and skillets and oodles of cooking methods, i nailed it.  the trick? a large enough cooking surface, plenty of olive oil, and a uniform cut.  my favorite potato to use is the yukon gold, hands down.  i find it to be the rockstar of all potatoes.  it fries up like no other, maintaining its sliced shape all the while.  not to mention the skin of the yukon is so paper thin, there’s never any reason in the world to remove it for a homefry. ever.  simply wash, dry and slice.  the size of your slice is a personal preference.  i find a width of 1/4 inch and an overall size of about an inch and half to be ideal to work with. it’s a trial and error game, for sure.

gaining a brown crust

here’s the gameplan: get the largest non stick cooking pan you own.  coat bottom with olive oil. (swirl to coat- don’t prep a drowning pool) prepare your potato on cutting board, so that you’re ready when your pan is calling. crank on the heat.  high first, and then just below high. add a sprinkle of crushed red pepper flakes. once you see the flakes sweating and dancing, it’s go time.  add your potatoes.  rearrange them so each and every one has plenty of contact face down in the oil.  see visual. now the hard part for us type A’ers… don’t mess with them.  this allows the down side to take on a beauteous brown hue, and a heavenly crispness.  this crisp side is critical to counteract the softness you’ll achieve at the end.  a plate of mush is what you’re trying to avoid at all costs.  salt the raw up side generously. check one after about 5 mins with a fork.  if you like what you see, take your spatula and flip it upside down in your grip. this is the way you wanna free your lovelies from the skillet.  you have to be fast, and apply a downward pressure toward the skillet surface at a 45 degree angle.  make attempts to rearrange with brown side upward. dust lightly with garlic powder and a sprinkle of dried parsley or oregano. (no need for pepper, as the red pepper flakes you tricked out your oil with will provide all the heat you need here)  obviously there are 50 ways you could flavor your potatoes.  i’m giving you the most basic recipe, with flavorings most every reader would have in their kitchen.  personally, i love mine with coriander powder, dried oregano, and even a pinch more salt.  if it’s summer and i have lots of fresh parsley outside… i’ll chop a bit and rain it down over my plate to finish. ok, back to cooking… cook like this for a few more minutes, and then add a 1/4 cup of water to hot skillet- IMMEDIATELY applying lid to steam them for a bit.  reduce heat to medium and allow to cook for 4 minutes or so.  stir- check for doneness, cooking a bit longer uncovered if needed.  enjoy with your favorite condiment. Heinz ketchup is a natural local partner for us Pittsburghers. -see visual.

perfect and simple anytime meal…
 
made even more perfect.

winner winner chicken dinner

celebrate the Fall season with this festive dish

there’s no denying it… the Fall season is in full swing- and the proof is all around us.  ground surfaces are being overcome with leaves, the clocks have been wound back, the jack o’lanterns have found their way to the compost heap, and the air holds the perfect crispness- replicated by no other season.  we’ve been as busy as bees, bringing wood closer to the house from outlying racks, stacking and sorting it, putting away patio furniture, stocking up on birdseed, and cleaning up the beds in preparation for the cold months ahead.  -and although i am more than happy to assist with all of said tasks… my cold weather preparations lie in test driving new and exciting soup and stew and ‘ladle over a bowl of rice’ types of recipes.  the air turns cold, we eat warm things.  makes perfect sense, right?!  nothing brings more pleasure, in my opinion, than a nice steaming bowl of savory stew to be enjoyed with some crusty buttery bread in a nice den with a fire.  typing that sentence alone gives me a killer visual… one where i fall asleep with a book on my chest… empty bowl beside me on the table… not a care in the world, right?  snap* snap* back to reality for most of us.  there’s homework to be done, bathing children, DVR’d shows to watch… so is the life of most Americans my age today.  (someday i will OWN that visual though… i suspect it will begin in my sixties, as i simultaneously OWN a grey bob haircut)

for now, i have tried this recipe twice… and it is a winner yo.  winner winner chicken dinner. (sorry) it allowed me to use a spice i’ve been dying to try… garam masala. garam masala is a yummy blend of many spices, often used in Indian cooking.  it’s very meaning is ‘hot mixture’ – and i’ve read about various combinations including some of the following: cloves, cinnamon, cumin, cardamom, peppercorns, ginger, star anise and turmeric.  i bought mine at the bulk spice section of whole foods, allowing me to buy just a couple of tablespoons for around 34 cents. (LOVE whole foods, but who doesn’t right?)  anyway, the preparation on this is pretty easy… and it even forces you to open a bottle of white wine, of which you will use half. i used a bottle of gifted chardonnay that has been sitting on my wine rack for a year- as it is my least favorite type of white.  this gave me the perfect excuse to use it up in a delicious way.  please be careful at the point where you are adding the wine to the pan… (deglazing) if you are not used to doing this, i ask you to turn your flame off first, just to avoid any splashing and possibility of flames.  as long as you add slowly, you should be fine.  there is a time and a place for the culinary flames sent from deglazing… and an industrial kitchen is usually preferable.

ingredients:

one package of boneless skinless chicken breasts (either three or four in pack)

one cup of flour

salt and pepper

2 T butter

oil for the pan (i always use olive)

half a bottle of white wine (chardonnay, pinot grigio, sauvignon blanc, reisling, etc)

14 oz can of diced tomatoes

1 bunch of green onions

2 teaspoons garam masala

1/2  teaspoon salt

1 teaspoon garlic powder

rice

so here’s what you do: cut your chicken into bite sized chunks, removing any skin or tendons.  salt and pepper your chicken. uncork your wine, so you are ready at that step and not fumbling to open it as your pan scorches.  add your cup of flour to a plate so that you are ready to dip your chicken in it.  open your can of tomatoes.  rinse and chop your green onions using all but the top inch or so of the greens.  prepare your spices in a small dish- setting aside a half a tsp of the allotted 2t of garam masala- as you will add it at the end.  ok, saddle up- here we go.  choose your favorite large skillet with a lid… can be either non stick or stainless- either way.  add a generous drizzle of oil to the pan, and add your butter.  turn on the heat to md. high.  working in batches, take a portion of your diced raw chicken, and set it in the flour. begin coating the chicken by flipping it around a bit in the flour. take the chicken in your hands and shake off the excess flour over the plate (as much as you can)- and add to now ready skillet. brown chicken slightly, flipping each piece over and being careful not to crowd your pan.  work in batches, and remove chicken to a plate to rest once it’s been lightly browned. you may need to add more oil or butter to the pan at least once during this process.  (note, you are not out to cook the chicken at this step, only to barely brown it so the flour adheres to the meat. end note.)

browning the chicken a bit

once all your chicken has been floured and browned, cut your flame and add a half a bottle of white wine… slowly.  you will hear a searing sound once it hits the hot skillet. scrape up the lovely browned bits from bottom and sides of pan with a wooden spoon. (in case it’s your first time- you have just deglazed a pan!) celebrate with a glass of remaining wine. lol.  add your onions, tomatoes, spices (again leaving a half t. of the garam masala behind to add later), and chicken.  stir to combine. bring to a boil and then immediately cover and reduce heat to simmer. simmer like this for 35 minutes.  this is the time when you should prepare your rice.  cook enough rice for four servings, at least. at end of 35 mins, add your reserved 1/2 tsp of garam masala to the chicken dish- and stir to combine.  remove from heat and allow to rest for five mins or so, uncovered.  if serving for sit down dinner- carefully transfer to a nice serving bowl and serve with a big bowl of rice alongside.  family style.   this meal is sure to please, and i am certain you will enjoy.  it’s exotic enough to break up your usual routine… without being overly exotic or fussy.

spice is nice
‘company worthy’

peace and love. enjoy!!

turkey keilbasa and kale soup ~ a winter warmer

winter warmer

the keilbasa and kale recipe i am about to share with you is a recipe i’ve been making for 6+ years ~ and it’s the ONLY thing i prepare that my husband won’t eat.  we joke about it and say he’s allowed one dislike.  he dislikes the kale – and in general tends to complain about soup as a meal.  as a soup lover, this is painful to deal with, especially once the weather turns cold in Pittsburgh.  i have been known to eat soup for breakfast, so no problems with me finishing the pot solo. this last batch i made lasted for three days. i gave a portion to my sister, of which my mom ate a bowl for lunch. it fed me for dinner 2 days and breakfast 2 days. it’s an absolutely delicious recipe – it was adapted from an Emeril recipe.  kale is very beneficial, especially when steamed.  it’s fiber combines with bile acids in our bodies- and when excreted, helps to lower cholesterol levels. it has many cancer lowering benefits, and special antioxidant and anti-inflammatory benefits. it’s extremely high in vitamins K, A, and C… with the vitamin K level being off the charts, literally.  Plus, using turkey keilbasa instead of it’s full fat polish counterpart lowers the fat significantly. the last time i prepared it, i used a carton of organic chicken stock- which helped enhance the flavor even more. i hope you enjoy this soup as much as i do- and make it year round as the different ingredients become more plentiful.  it’s made to be toyed with… so add some shredded rotisserie chicken if you wish… or up the garlic to four cloves… you feelin’ me?

Turkey Keilbasa and Kale soup : the goods

1 T olive oil

1 fennel bulb (fronds removed- bulb chopped)

1 large onion chopped

3 cans chicken broth (or 32oz. carton of chicken STOCK- for more flavor)

7 cups of water

2 sweet potatoes (peeled and small dice)

1 package of turkey keilbasa (small to medium dice)

3 cloves garlic (minced)

3/4 cup uncooked orzo pasta

2 handfuls of baby carrots (or four large carrots- peeled and diced)

1.5  tsp of salt

1/2 tsp of black pepper

1.5 tsp of dried parsley

few shakes of cayenne pepper

big pinch of dried thyme

large bunch of kale – trimmed from stem and chopped a bit into bite sized leaves

(you will end up with a huge pile of kale… don’t panic, this reduces down greatly once added to the soup)

~saute in a large dutch oven or soup pot: fennel and onion in olive oil for about 5 mins or until tender/translucent. Add broth through herbs, (not kale) and bring to a boil.  Reduce heat, and simmer 15 minutes covered.  Uncover and add big pile of kale leaves and press down into broth – cover again and simmer for 15 mins more.  ENJOY!!!

kale- the super food
adding the kale
ready to serve
your big pot of yum
curing colds across america

~this soup truly gets better as it sits there… and the day(s) to follow.  if you like kale… or if you are willing to try new things… please attempt this.  please do not leave out the fennel (anise) either… once you saute it, your nose will tell you why.  it’s what makes this soup special.

peace and love yo.

Blog at WordPress.com.

Up ↑

Cup of Jo

a pittsburgh hippie chick's unbridled love for all things food related

Everybody Likes Sandwiches

a pittsburgh hippie chick's unbridled love for all things food related

Sew Mama Sew

a pittsburgh hippie chick's unbridled love for all things food related

Not Without Salt

a pittsburgh hippie chick's unbridled love for all things food related