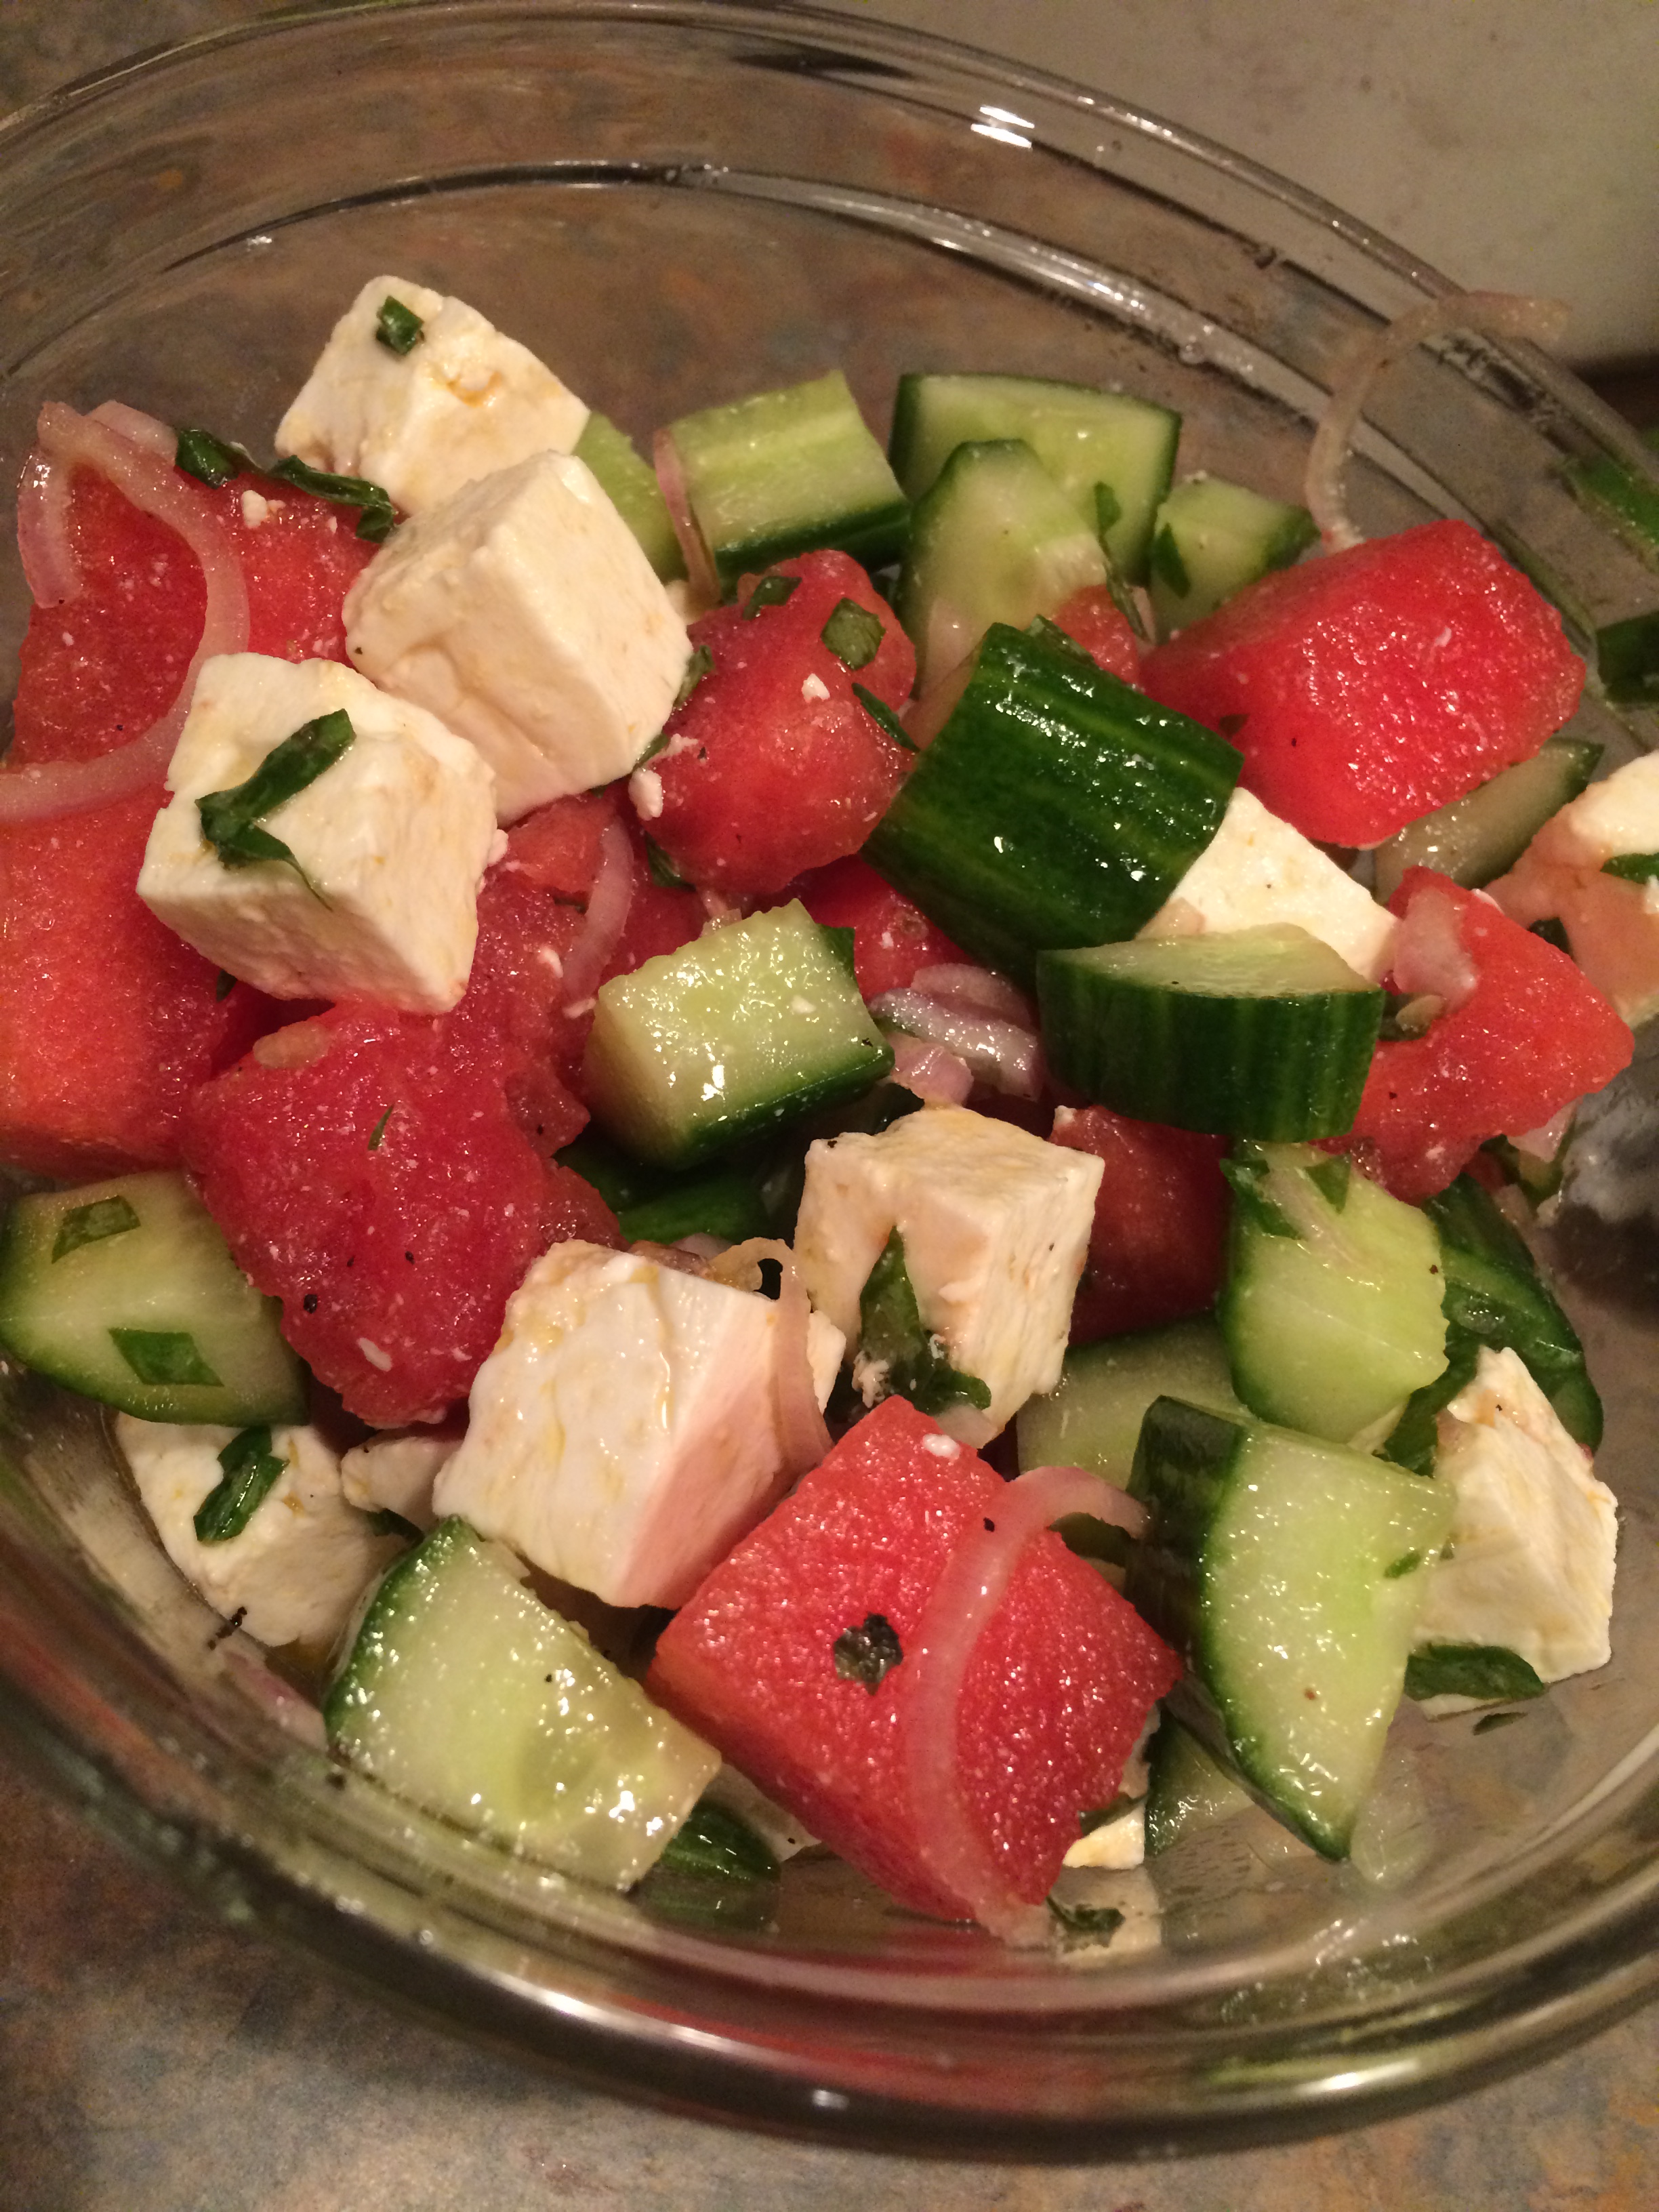
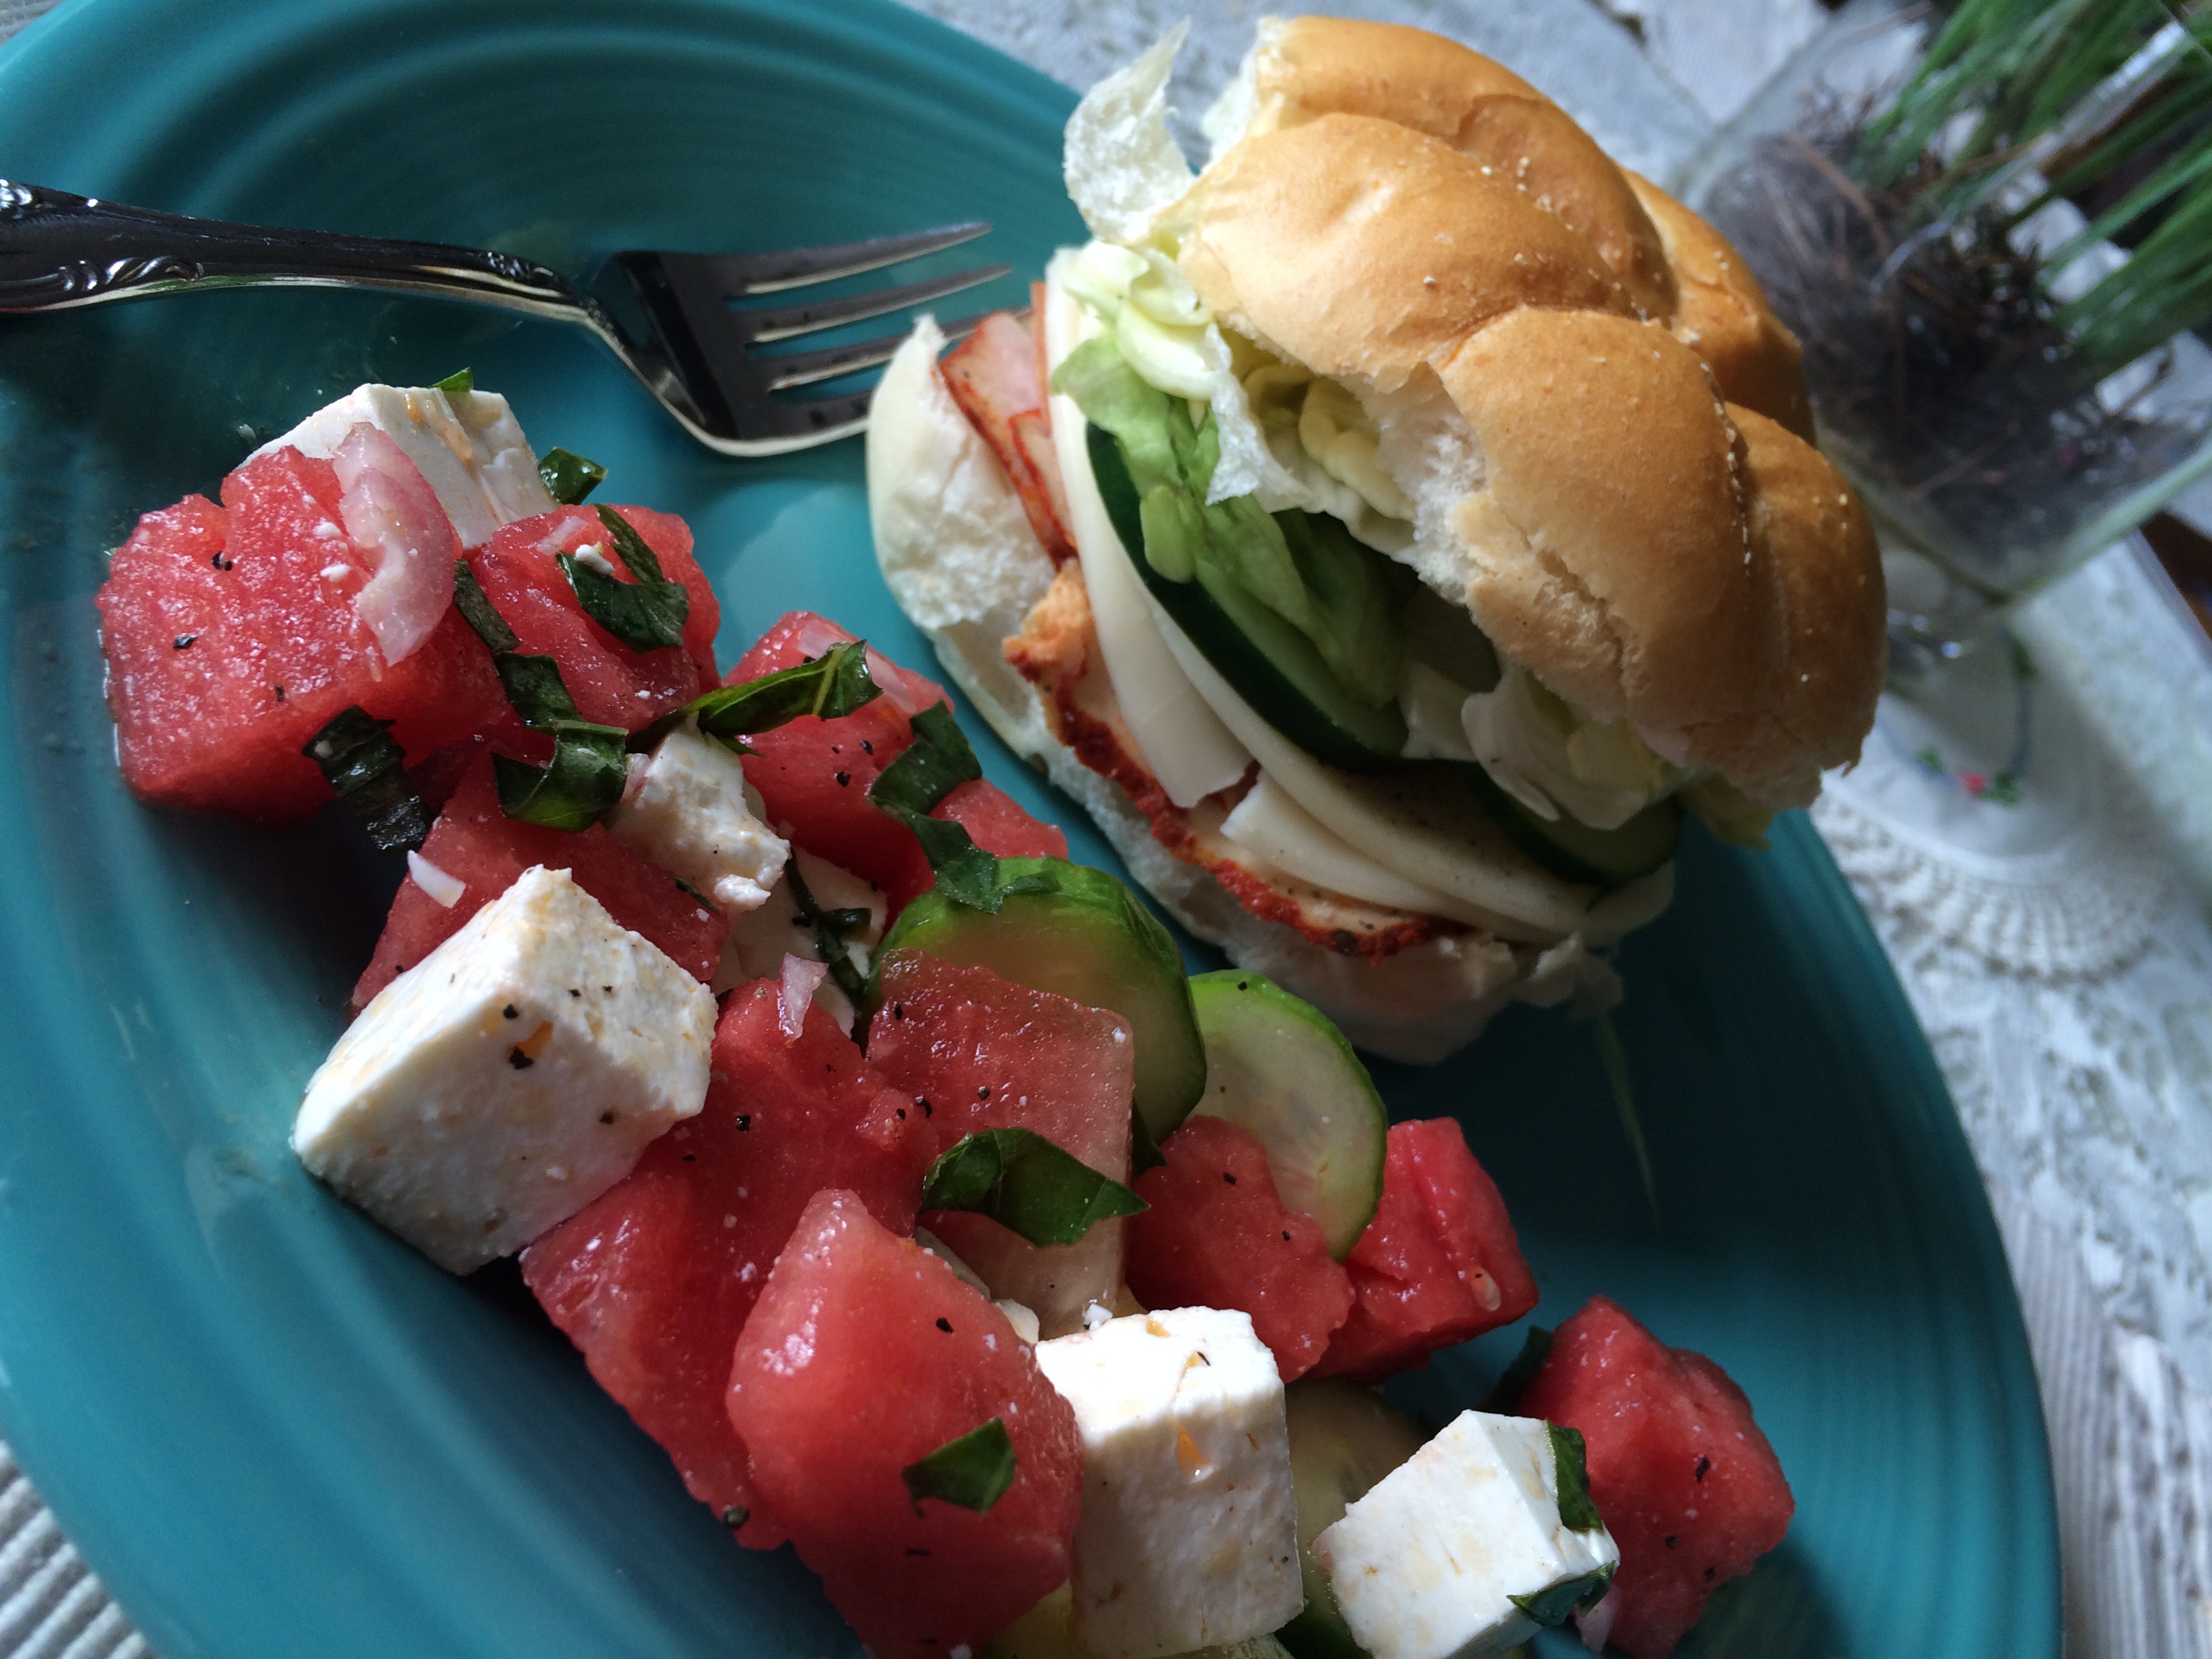
the first time I tasted this salad, a doctor friend of mine brought it to work to share with all of us. I was smitten. somehow, the saltiness of the feta was the perfect, albeit unlikely compliment to the sweetness of the juicy watermelon. Add in crunchy seedless cucumber chunks and fresh basil… and you’re about to board the happy train. I wanted to keep this very simple, but still chocked full of flavor- so I added as few things as possible to the mix. technically, you could leave out the cucumber if you didn’t have it, and it would be just as yummy. I do enjoy the crunch of the cukes though – and they bulk it up a bit more as well. I added shallot, one small one, as I thought the red onion would be a bit overpowering. the recipes I viewed on the internet called for mint. I prefer basil in mine, so I went with it. I like the taste of fresh squeezed lime, so I used some of that as well. ok enough talk… HERE IS WHAT YOU DO.
purchase: need
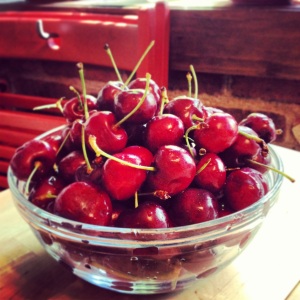
a bit of watermelon
a block of feta cheese (costs more than crumbled, but looks OH SO much prettier here)
a small shallot
a juicy lime
a small handful of basil (maybe 7 leaves) chopped
a seedless cucumber (or a few of those cute baby cucumbers Aldi carries)
two tablespoons of either red wine vinegar or white wine vinegar
TO PREPARE THIS:
decide what bowl you want to serve this in, and then make only that much.
carefully dice up some of your watermelon **(I write this assuming everyone knows how to cut a watermelon… but if not here goes. Cut watermelon in half, lay one half cut side down on your cutting board and begin to carefully slice this into slices going from right to left or left to right. if you want to chunk it- carefully cut rind off and cube it nicely into a container. otherwise cut slices in half and place in airtight container if you are that person who likes to eat it off of the rind. I am NOT that person. I like my watermelon chunked and in a pretty container ready for me to scoop out a bowlful at any given moment. my husband and my daughter are the rind types. I just don’t get it.)
cut your feta into pretty chunks.
slice/chunk your cucumbers.
wash and cut your basil
cut your shallot into thin slices.
in a small bowl, squeeze all of the juice from one lime. to this, add a bit of vinegar. mix them and set aside.
in a large bowl (big enough to toss this with clean hands…) add all ingredients. pour the lime and vinegar juices on top. toss together with clean hands. transfer to your serving bowl. if extra, store in airtight container for up to four days. it won’t last that long, trust me. Enjoy!!
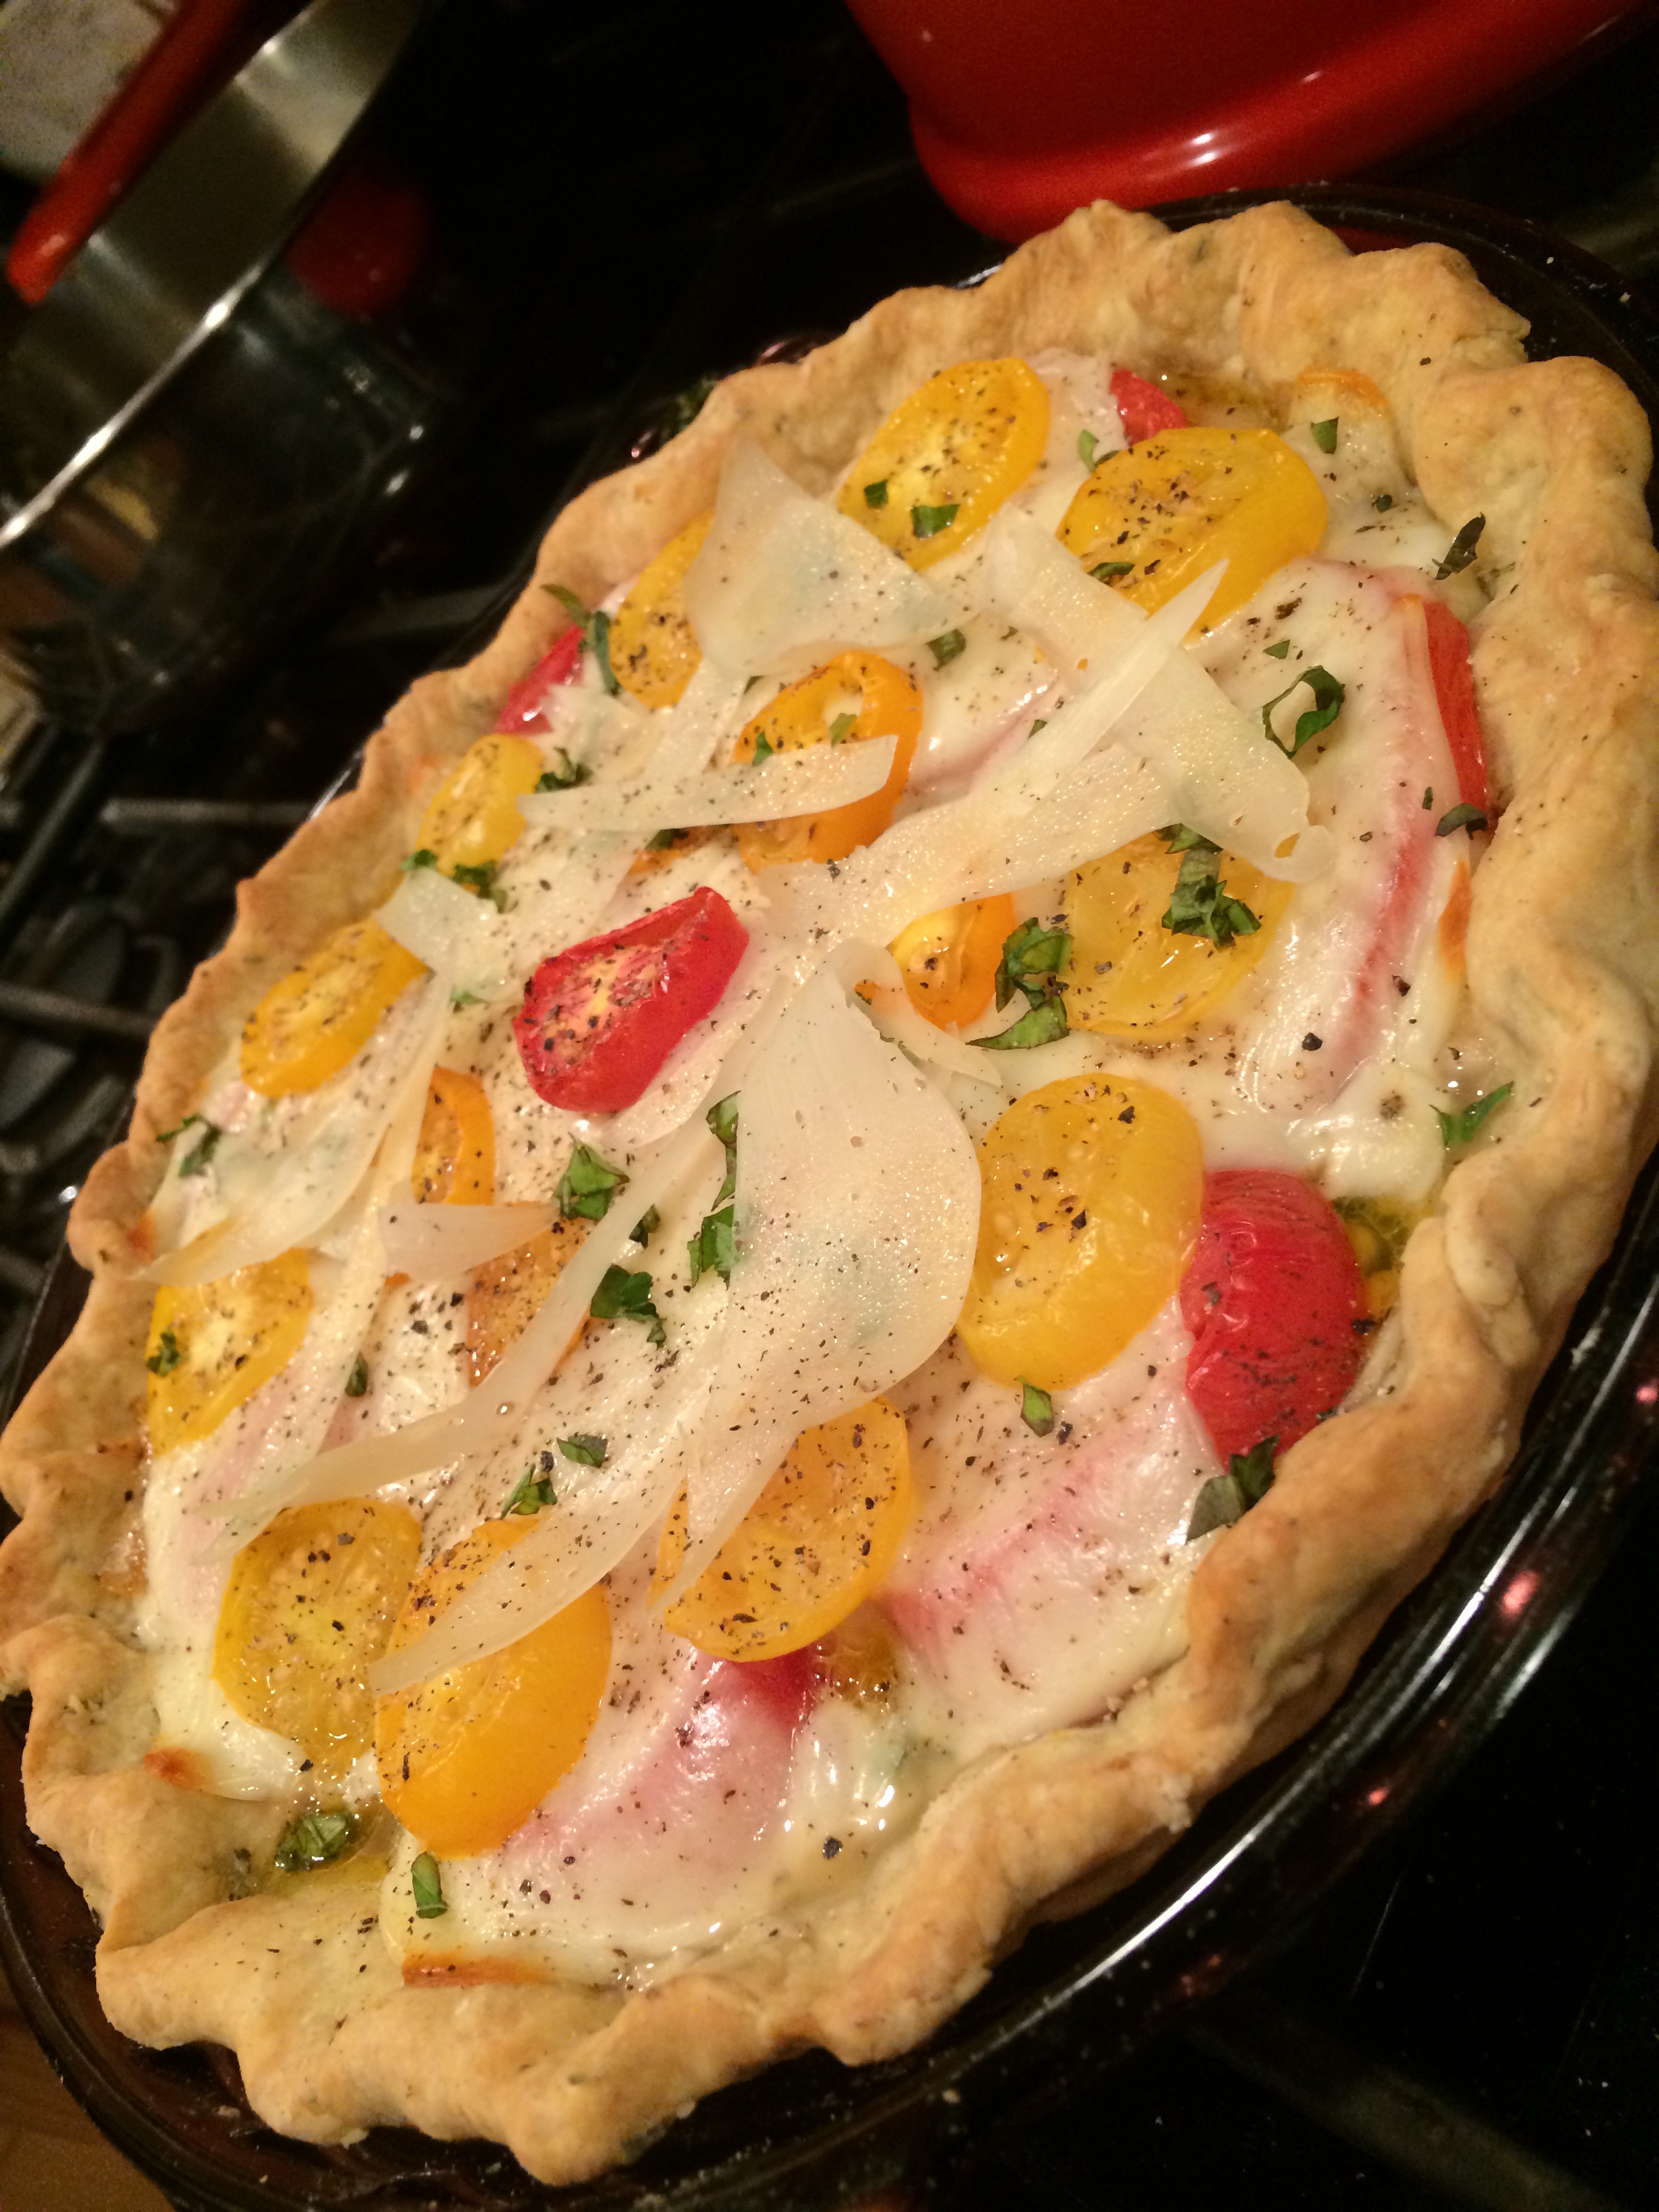
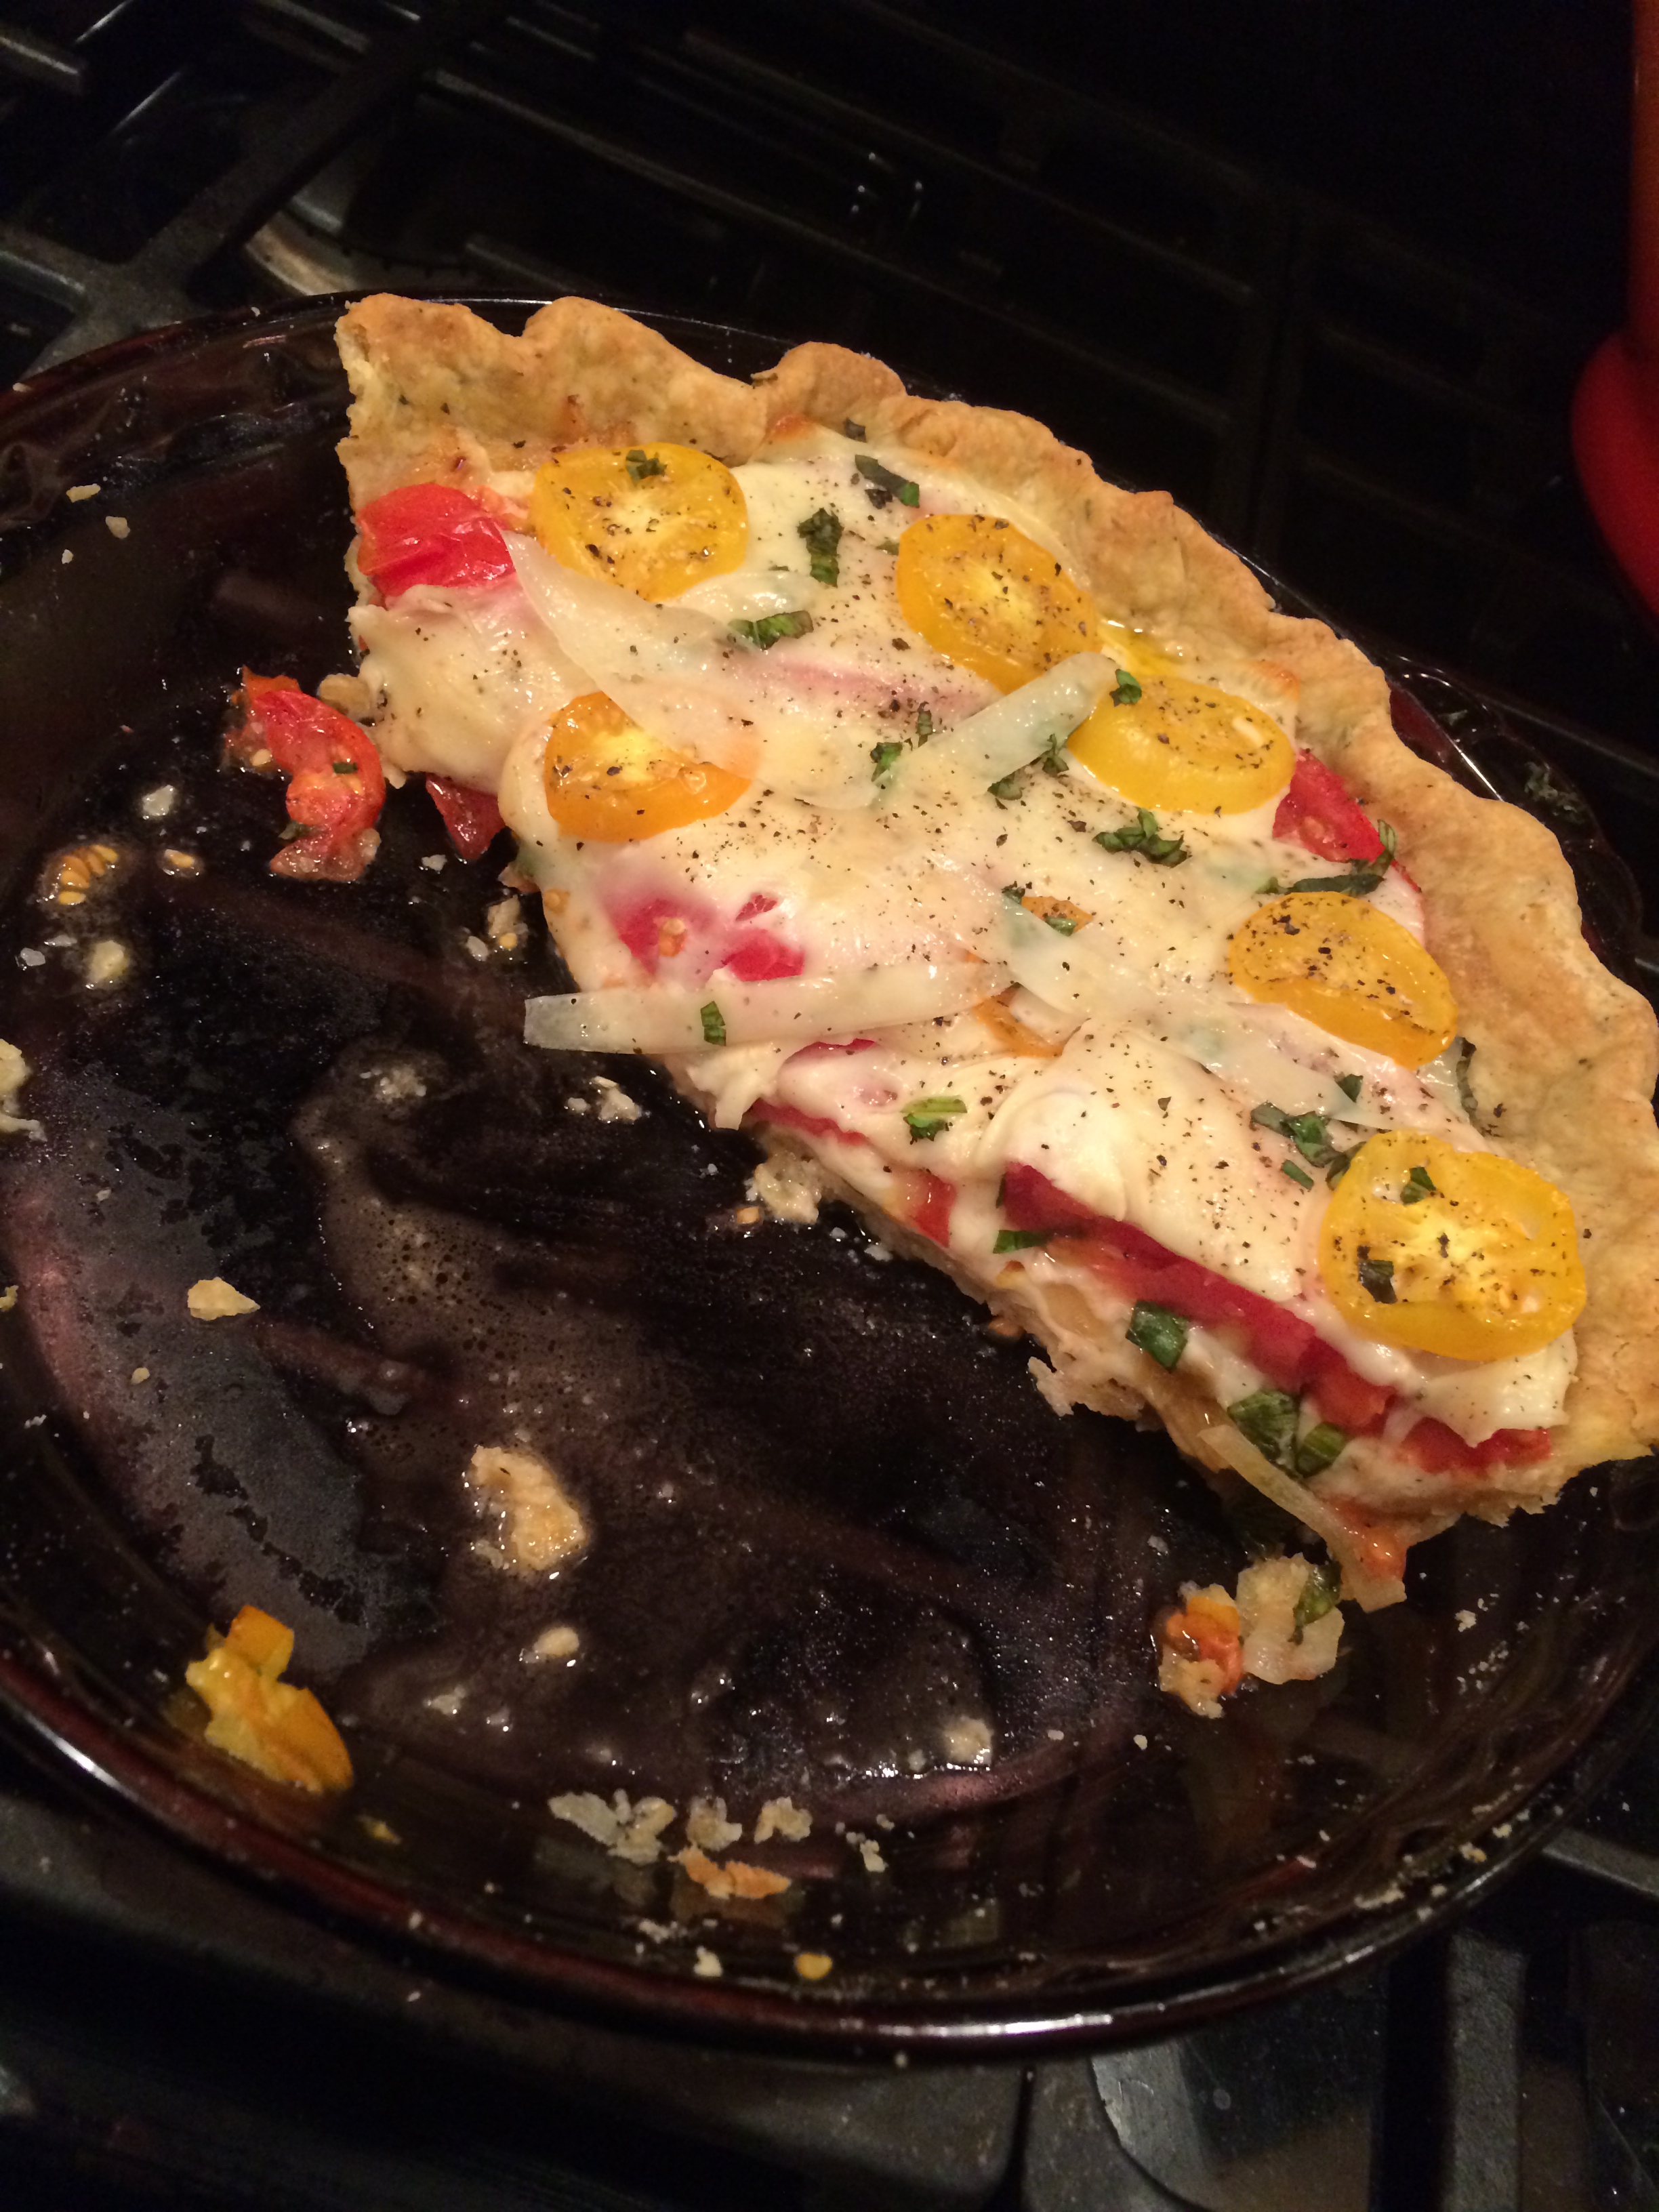
last evening was delightful. it surprises me that i jump in with that statement, given the fact that we are in the thick of two tots at home with a nasty childhood virus known as Hand Foot and Mouth disease. which… thankfully so far has been completely bearable. neither child has been febrile, (aka- no fevers; sorry nurse in my coming out) and their spirits have been high and completely untarnished. they are… simply put… contagious. so at home with me they have remained over the past few days. yesterday was a lovely sunny autumn day in Pittsburgh, so we took advantage and lassoed up the poodle to visit our local off leash dog park. he ran his heart out, as always, and we had fun watching and breathing in some of the fresh end of summer air. my dinner plans had been in mental motion from late morning, as i looked at five or so impeccably perfect garden ripe tomatoes, as well as a small bowlful of yellow round cherry tomatoes with excellent flavor. i knew i loved my friend’s tomato pie, i mean really loved it, the last time i visited her for a girls weekend with some pals. she is always cooking up something wholesome and fresh and seasonal each time we visit… and knocking our socks off, which is probably why we get along so well! she has the most charming blog as well, called Simplify Wellness. give it a whirl if you are wellness minded like i am. so yeah, tomato pie. i knew i could do it. i obtained some important tips from WFOHBH (wellness friend of hotbox hipster), like laying the tomato slices out on paper towels to let them sweat for a half hour. i was shocked at how wet the towels were afterward! i found a lovely recipe for a ‘healthy’ pie crust (i know, right?) that used extra virgin olive oil instead of butter. not that i don’t like LOVE butter, make no mistake… but i am always looking for nice alternatives along my cooking paths. i located the recipe at a lovely little blog called Chocolate & Zucchini. this is the LINK for your enjoyment!
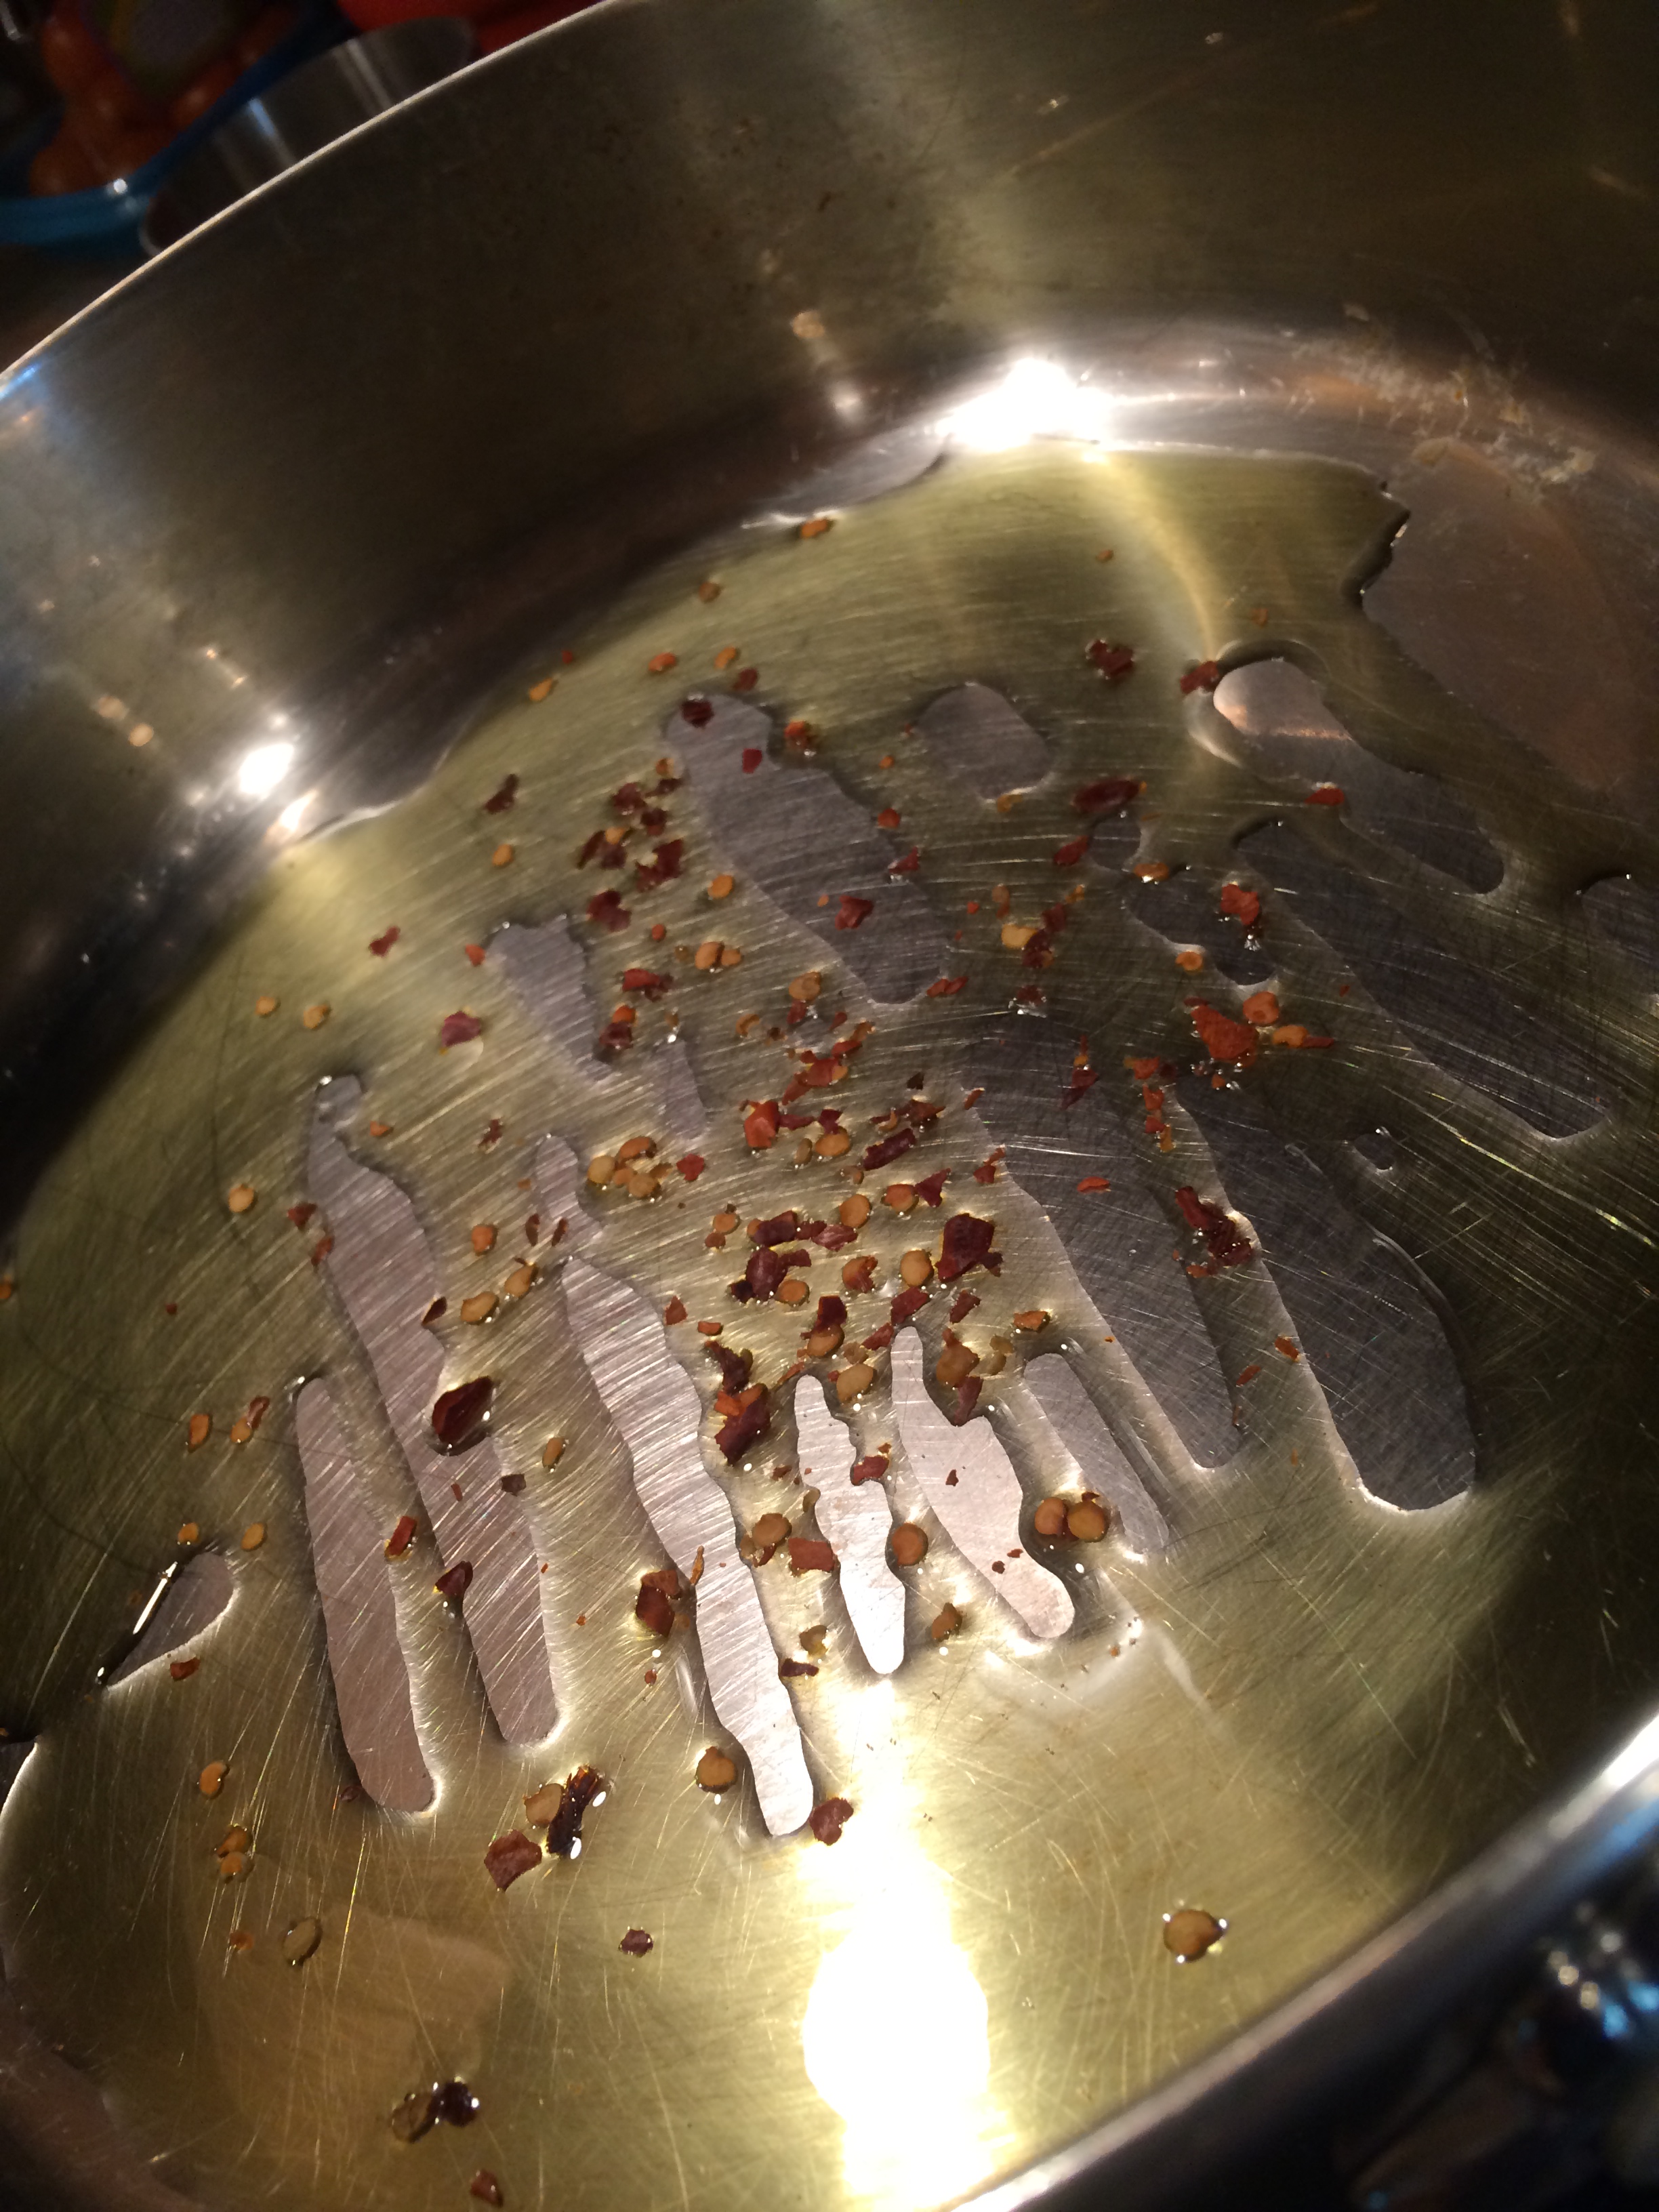
so the tots began preparing for a magic show they would put on for hubby and i later that evening, giving me plenty of ME time in the kitchen. this pie was as simple as could be, layering tomatoes, freshly chopped basil, and cheeses… but i wanted it to have another level of flavor. ‘kick it up a notch’ if you will – in the words of wickedly talented Emeril. how better to achieve that than with sauteed onions and garlic? as the pan was heating for this task, i hit it with some olive oil, and then i sprinkled in a generous shake of red pepper flakes.
i ended up almost caramelizing the onions/garlic over low heat, and the result was fabulous. OK let’s get on with this rodeo…
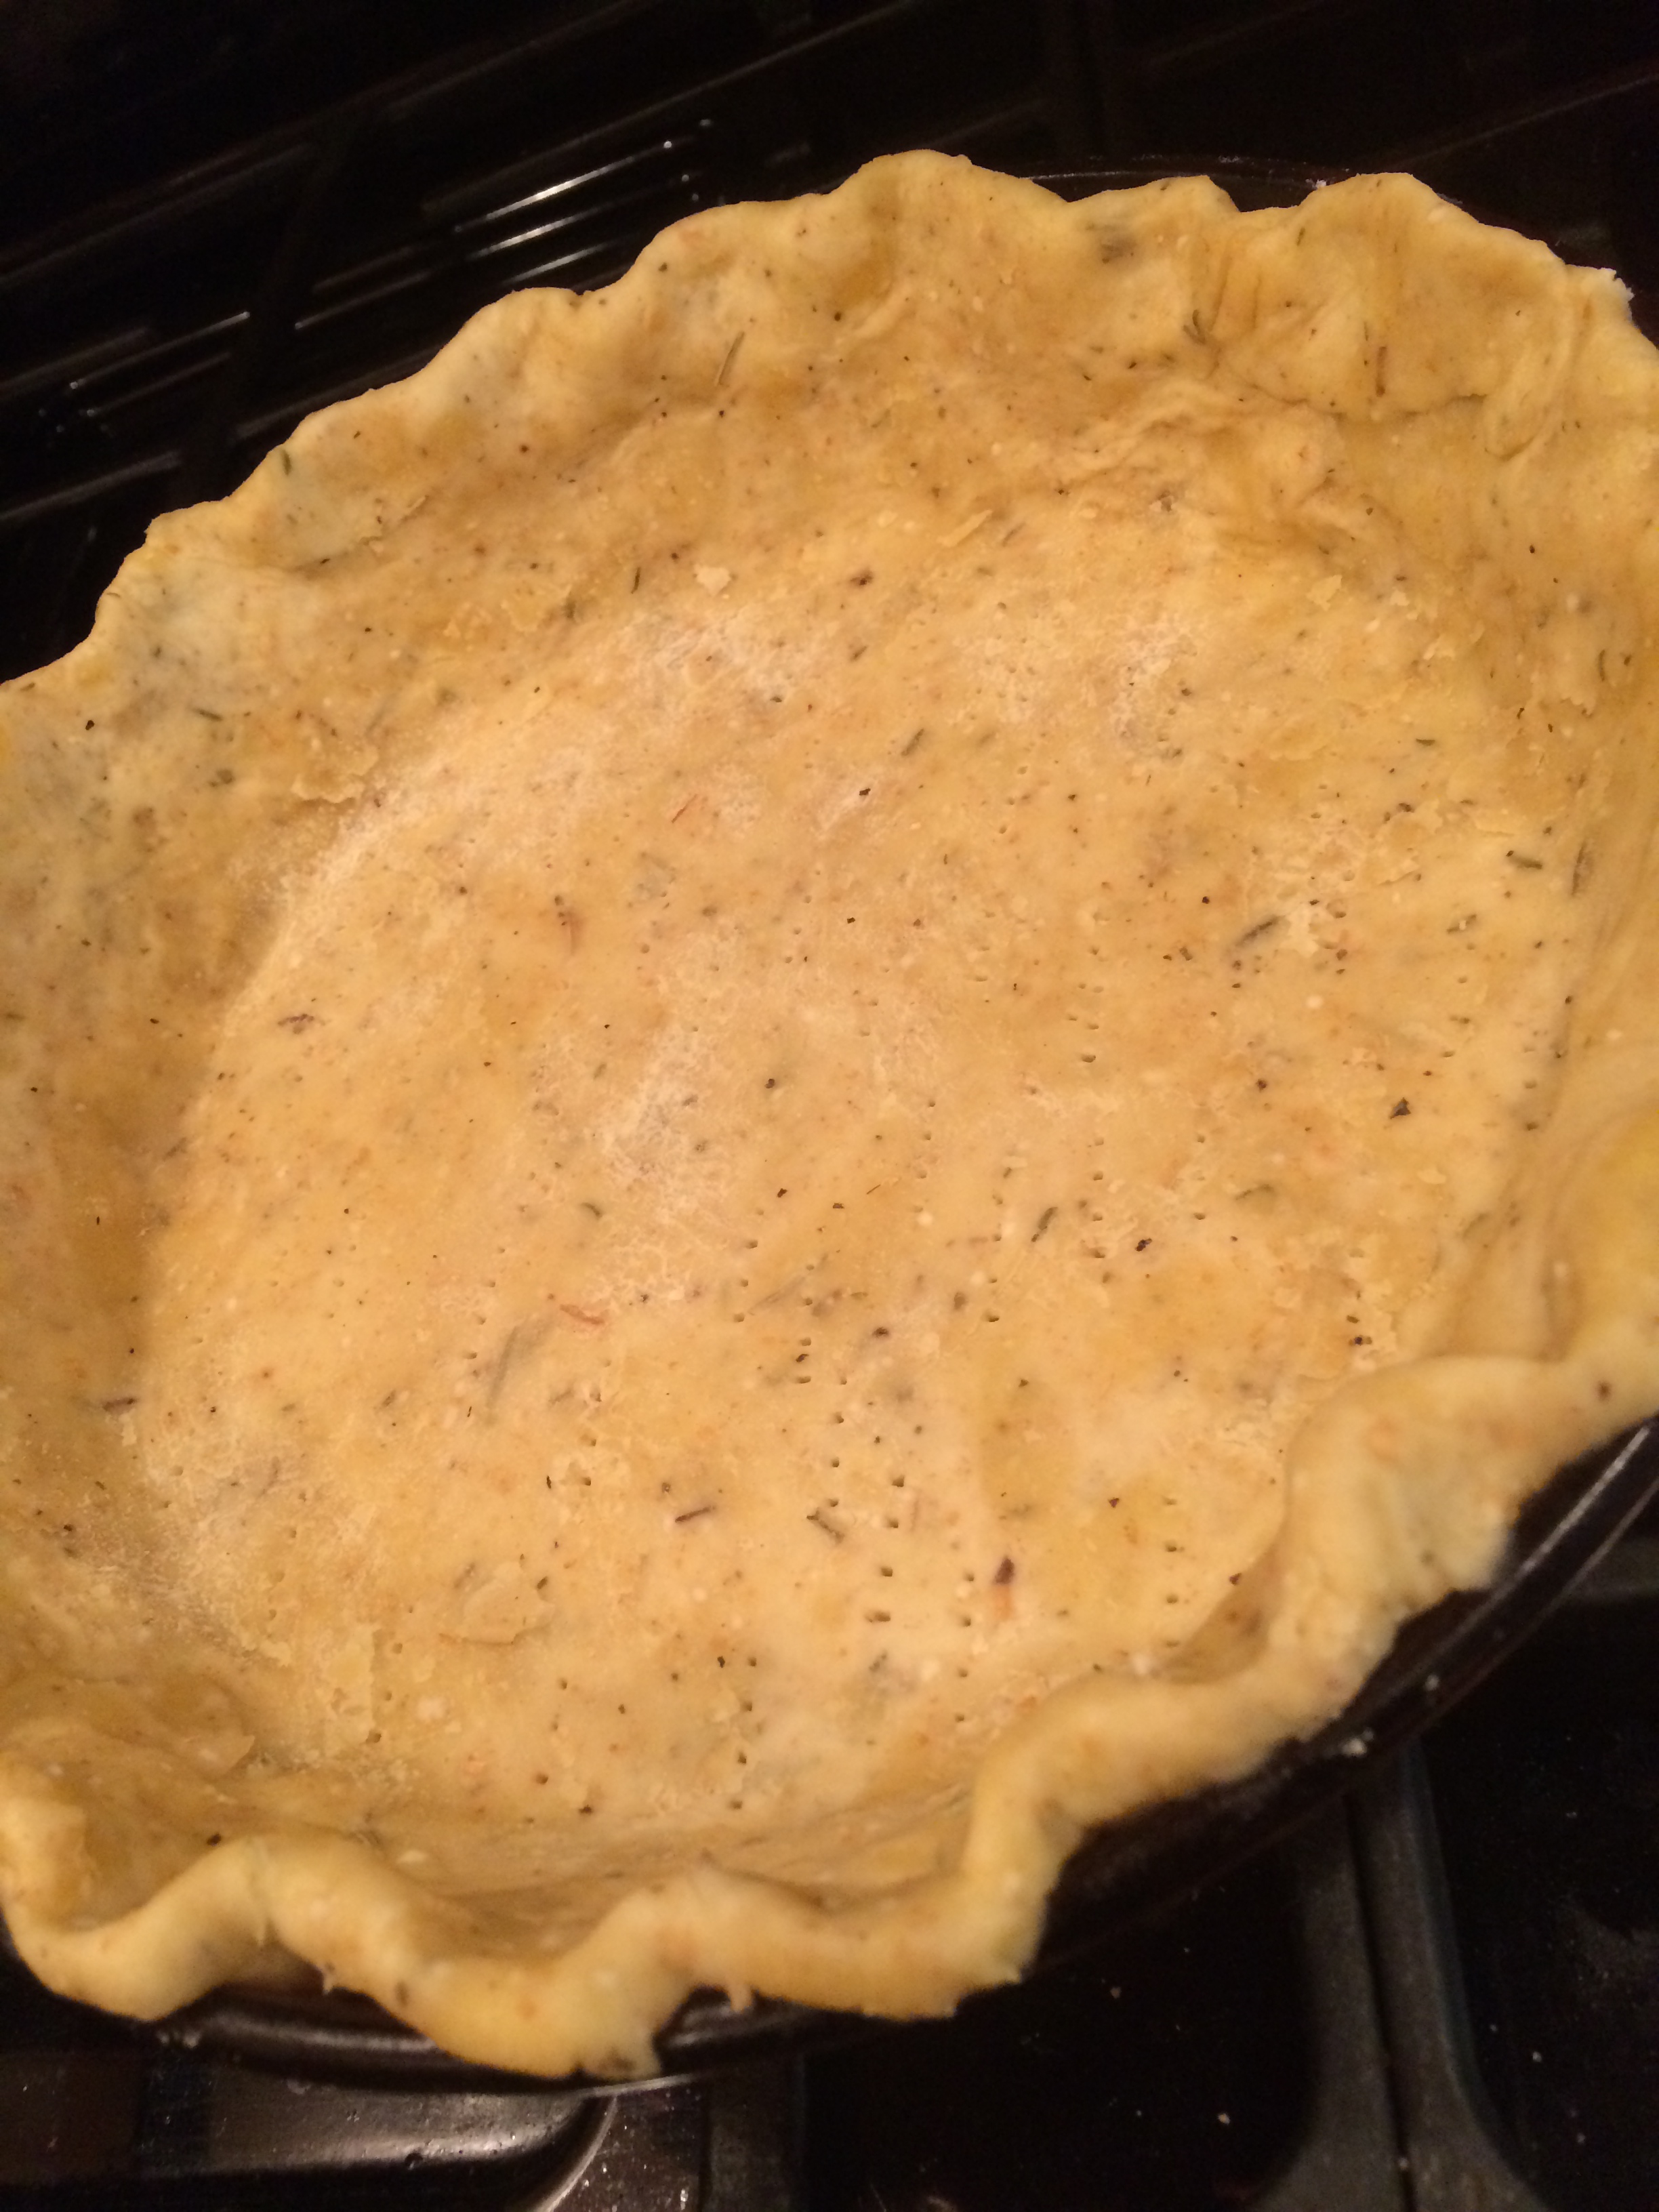
THE CRUST:
2 cups flour (whole wheat or all purpose or a mix of both)
1 tsp of salt
1/4 tsp of black pepper
1/4 tsp dried thyme
1 tsp of dried rosemary
couple pinches of dried basil and oregano as well
1/4 cup of olive oil (i used extra virgin, but any will do)
1/2 cup COLD water
add dry ingredients in a medium sized mixing bowl. stir to combine. add in your 1/4 c of olive oil. mix with a fork a bit to combine. (won’t all be combined, and will be course to large crumbles) mix in the cold water with same fork until starting to come together. set your fork down, and get one hand in there, finishing the job until you can turn it out in one piece onto a floured counter. roll it, adding a sprinkle of flour as necessary, until it looks like it will fit your pie plate. add it to the plate, shape it, flute the edges if you want, and fork the bottom a bit. throw it in the fridge for a half hour. then remove from fridge and bake it at 400 degrees for 25 or 30 mins. remove from oven and let cool. you could literally use this crust for anything you can think up from a yummy veggie pie with zucchini, tomatoes and asparagus with swiss cheese… or an onion and swiss chard with bacon breakfast creation… a chicken pot pie with fresh mushrooms… i mean the possibilities are endless.
THE FILLING:
four ripe medium to large tomatoes / or other heirloom variations
half a large onion, thinly sliced
2-3 cloves of garlic, minced
mozzarella cheese slices
provolone cheese slices
shaved or grated Parmesan for the top
fresh basil leaves (about a half cup, chopped) – reserve some to sprinkle on top after baking.
WHAT YOU DO:
Prepare your pie crust as instructed above. While it is cooling from baking, you can begin preparations for the filling. Slice your tomatoes (medium thickness) and lay them out on some paper towels to sweat. saute in olive oil (with some shakes of hot pepper flakes) your sliced onion…. after about four minutes, add the garlic and then turn heat to low. let it go for a bit, until onions take on a nice light brown hue. remove from heat. once your pie crust has cooled down, begin layering. First do a layer of provolone. (i think this took four or five slices) then do a layer of tomatoes. salt and pepper that layer, and add the chopped basil atop. then a layer of mozzarella. then the sauteed onions. then another layer of tomatoes. i ended with a layer of mozzarella, and then i topped it off with a bunch of sliced yellow small tomatoes.
((i should add, that along the way, when i reached a cheese topped layer, i gave the whole thing a good firm pressing on with my hands. ‘smoosh it down a bit, yo!’ )) hit the top with some black pepper- and put it into a 375 degree oven for about 25 minutes or so. remove from oven, sprinkle with fresh basil, shave some Parmesan cheese over the top, and let it cool off a bit before cutting. (like 15 mins or so) Pour yourself a nice cold beer… or a glass of wine… and get ready to eat one of the most surprisingly unique and shockingly delicious meals you’ve made in awhile!
we literally had to stop ourselves from eating this WHOLE PIE in one sitting… who ARE we?? no joke, it was THAT good. I had a piece and a half… and I knew I wanted to enjoy it the next day… (if the nerd in me is being honest, seeing how it holds up for day 2 crossed my mind!) tonight is the night- I am less than an hour from leftover heaven on a plate… and since I have no cooking to do, these summer wheat beers I’ve had stashed away are tasting even sweeter right now as I wrap up! how will you close out your last week of summer??? make this pie dude. do it.
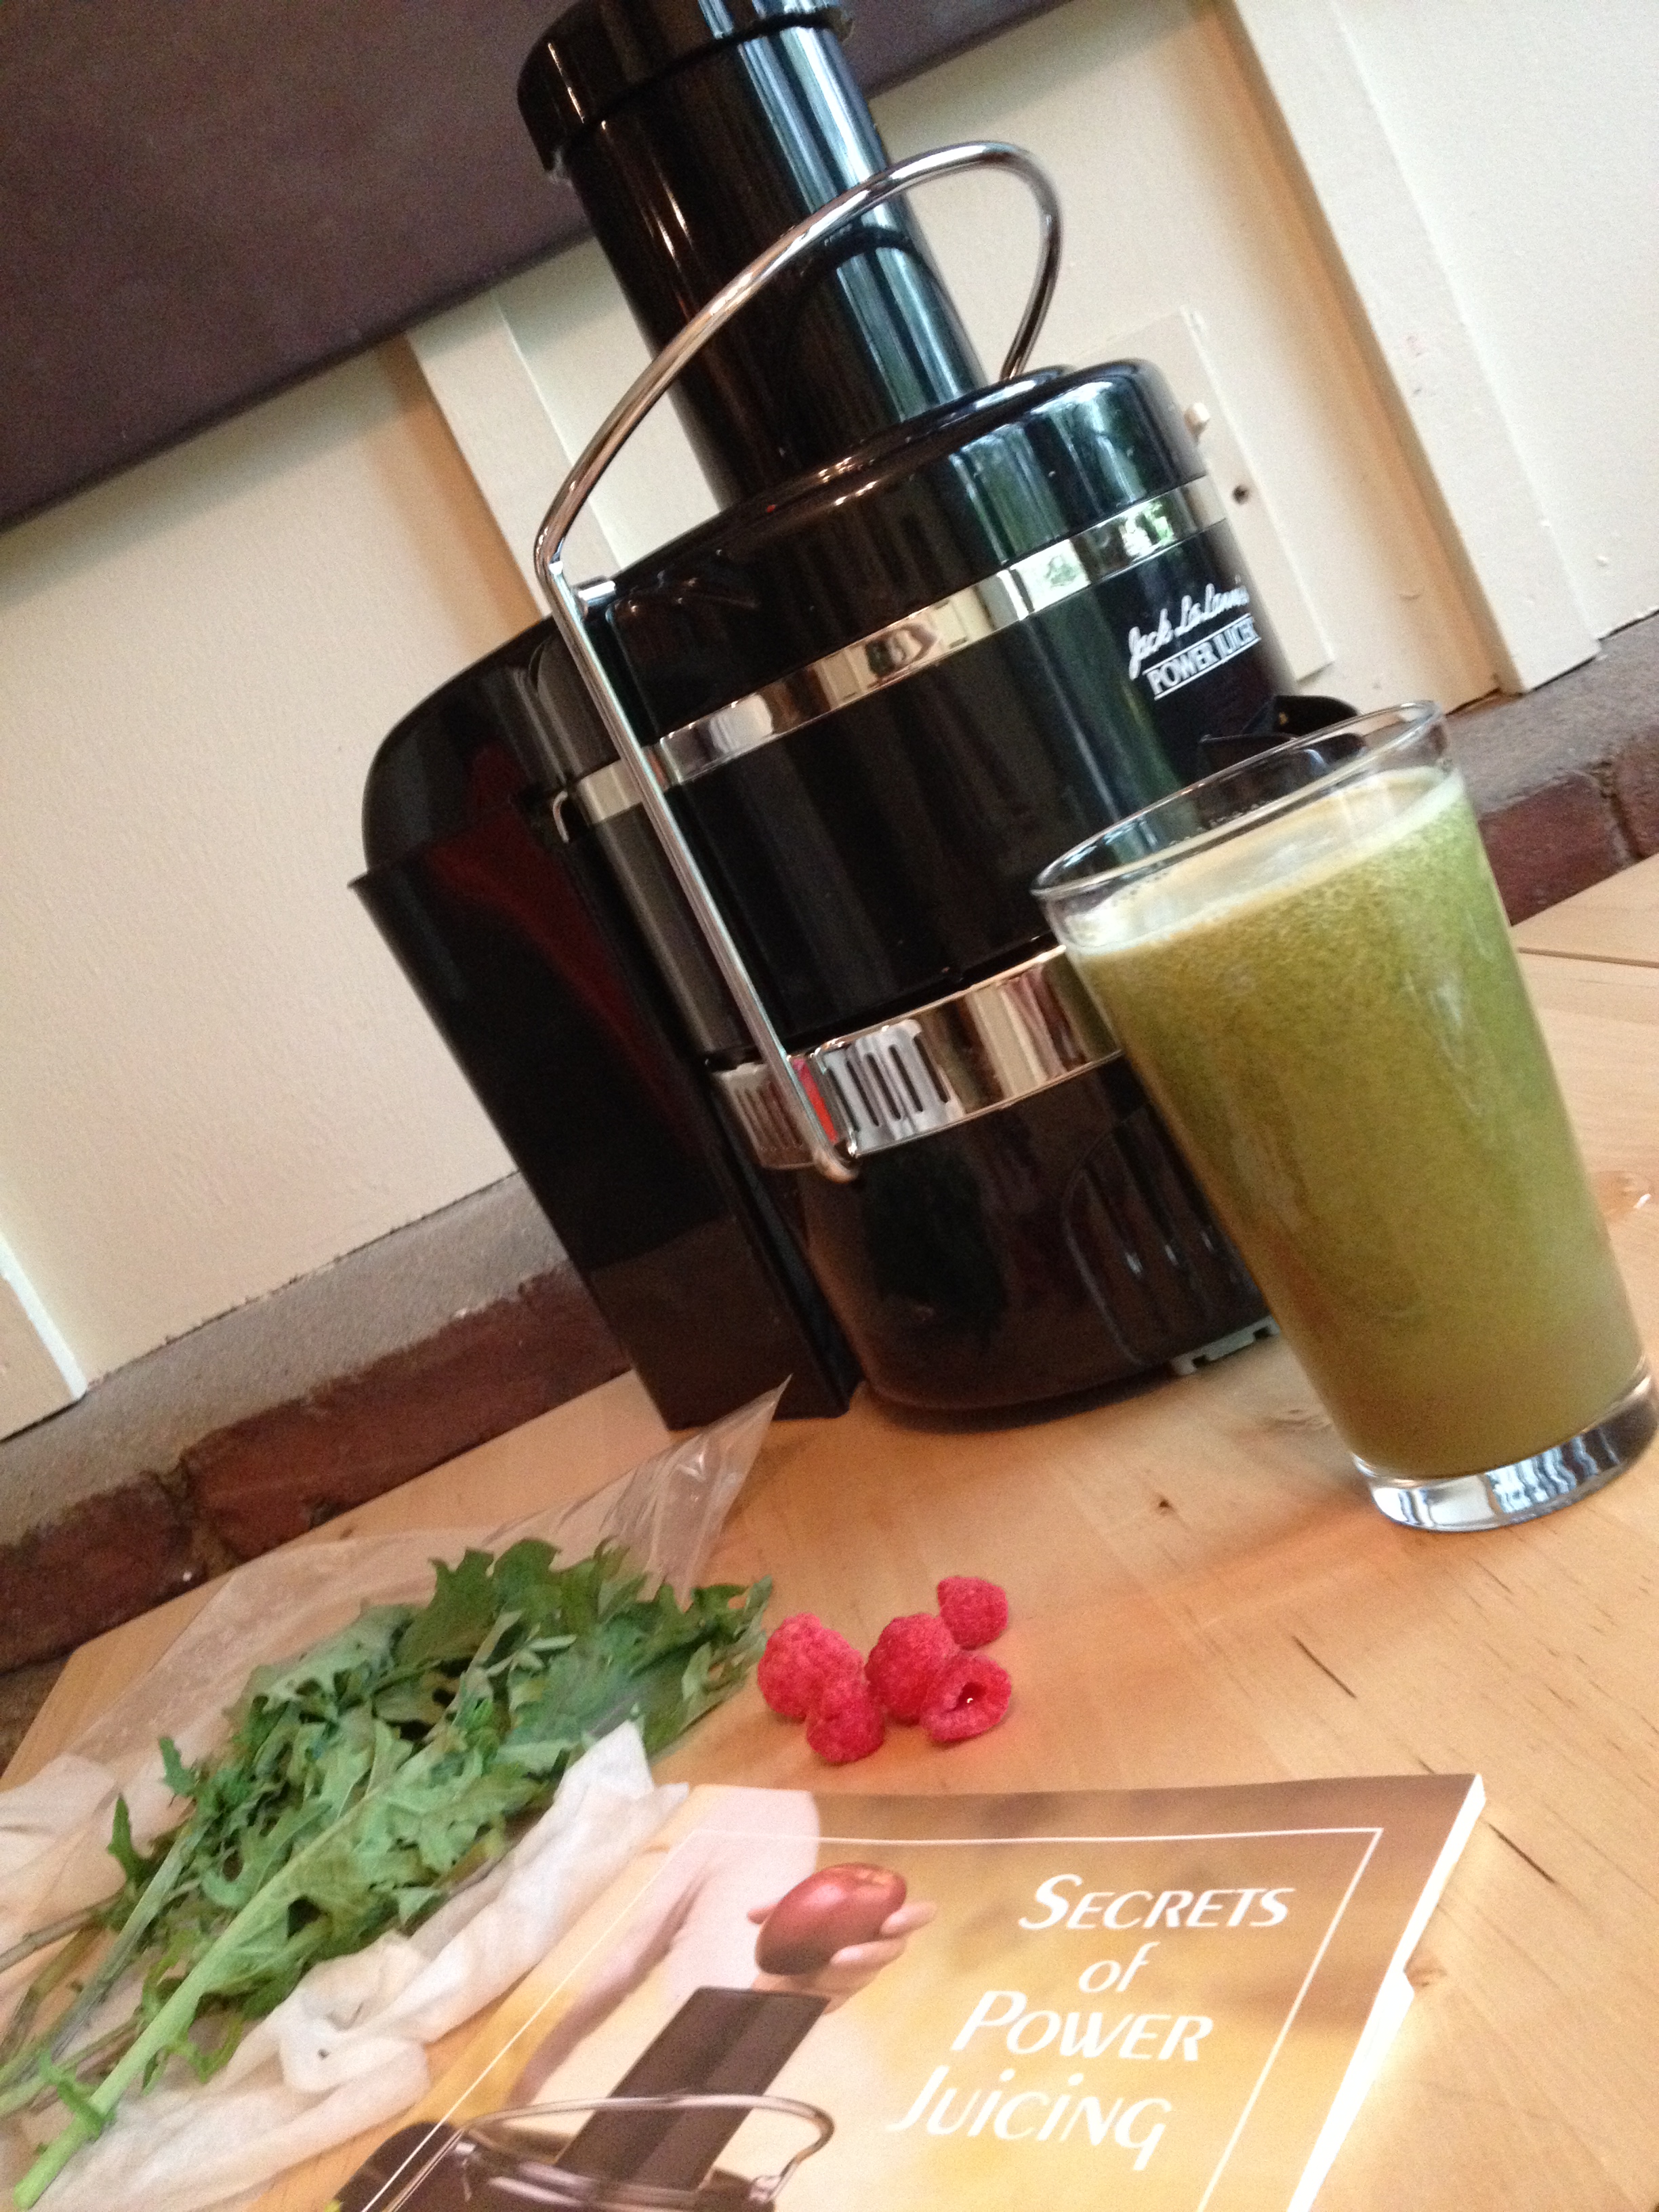
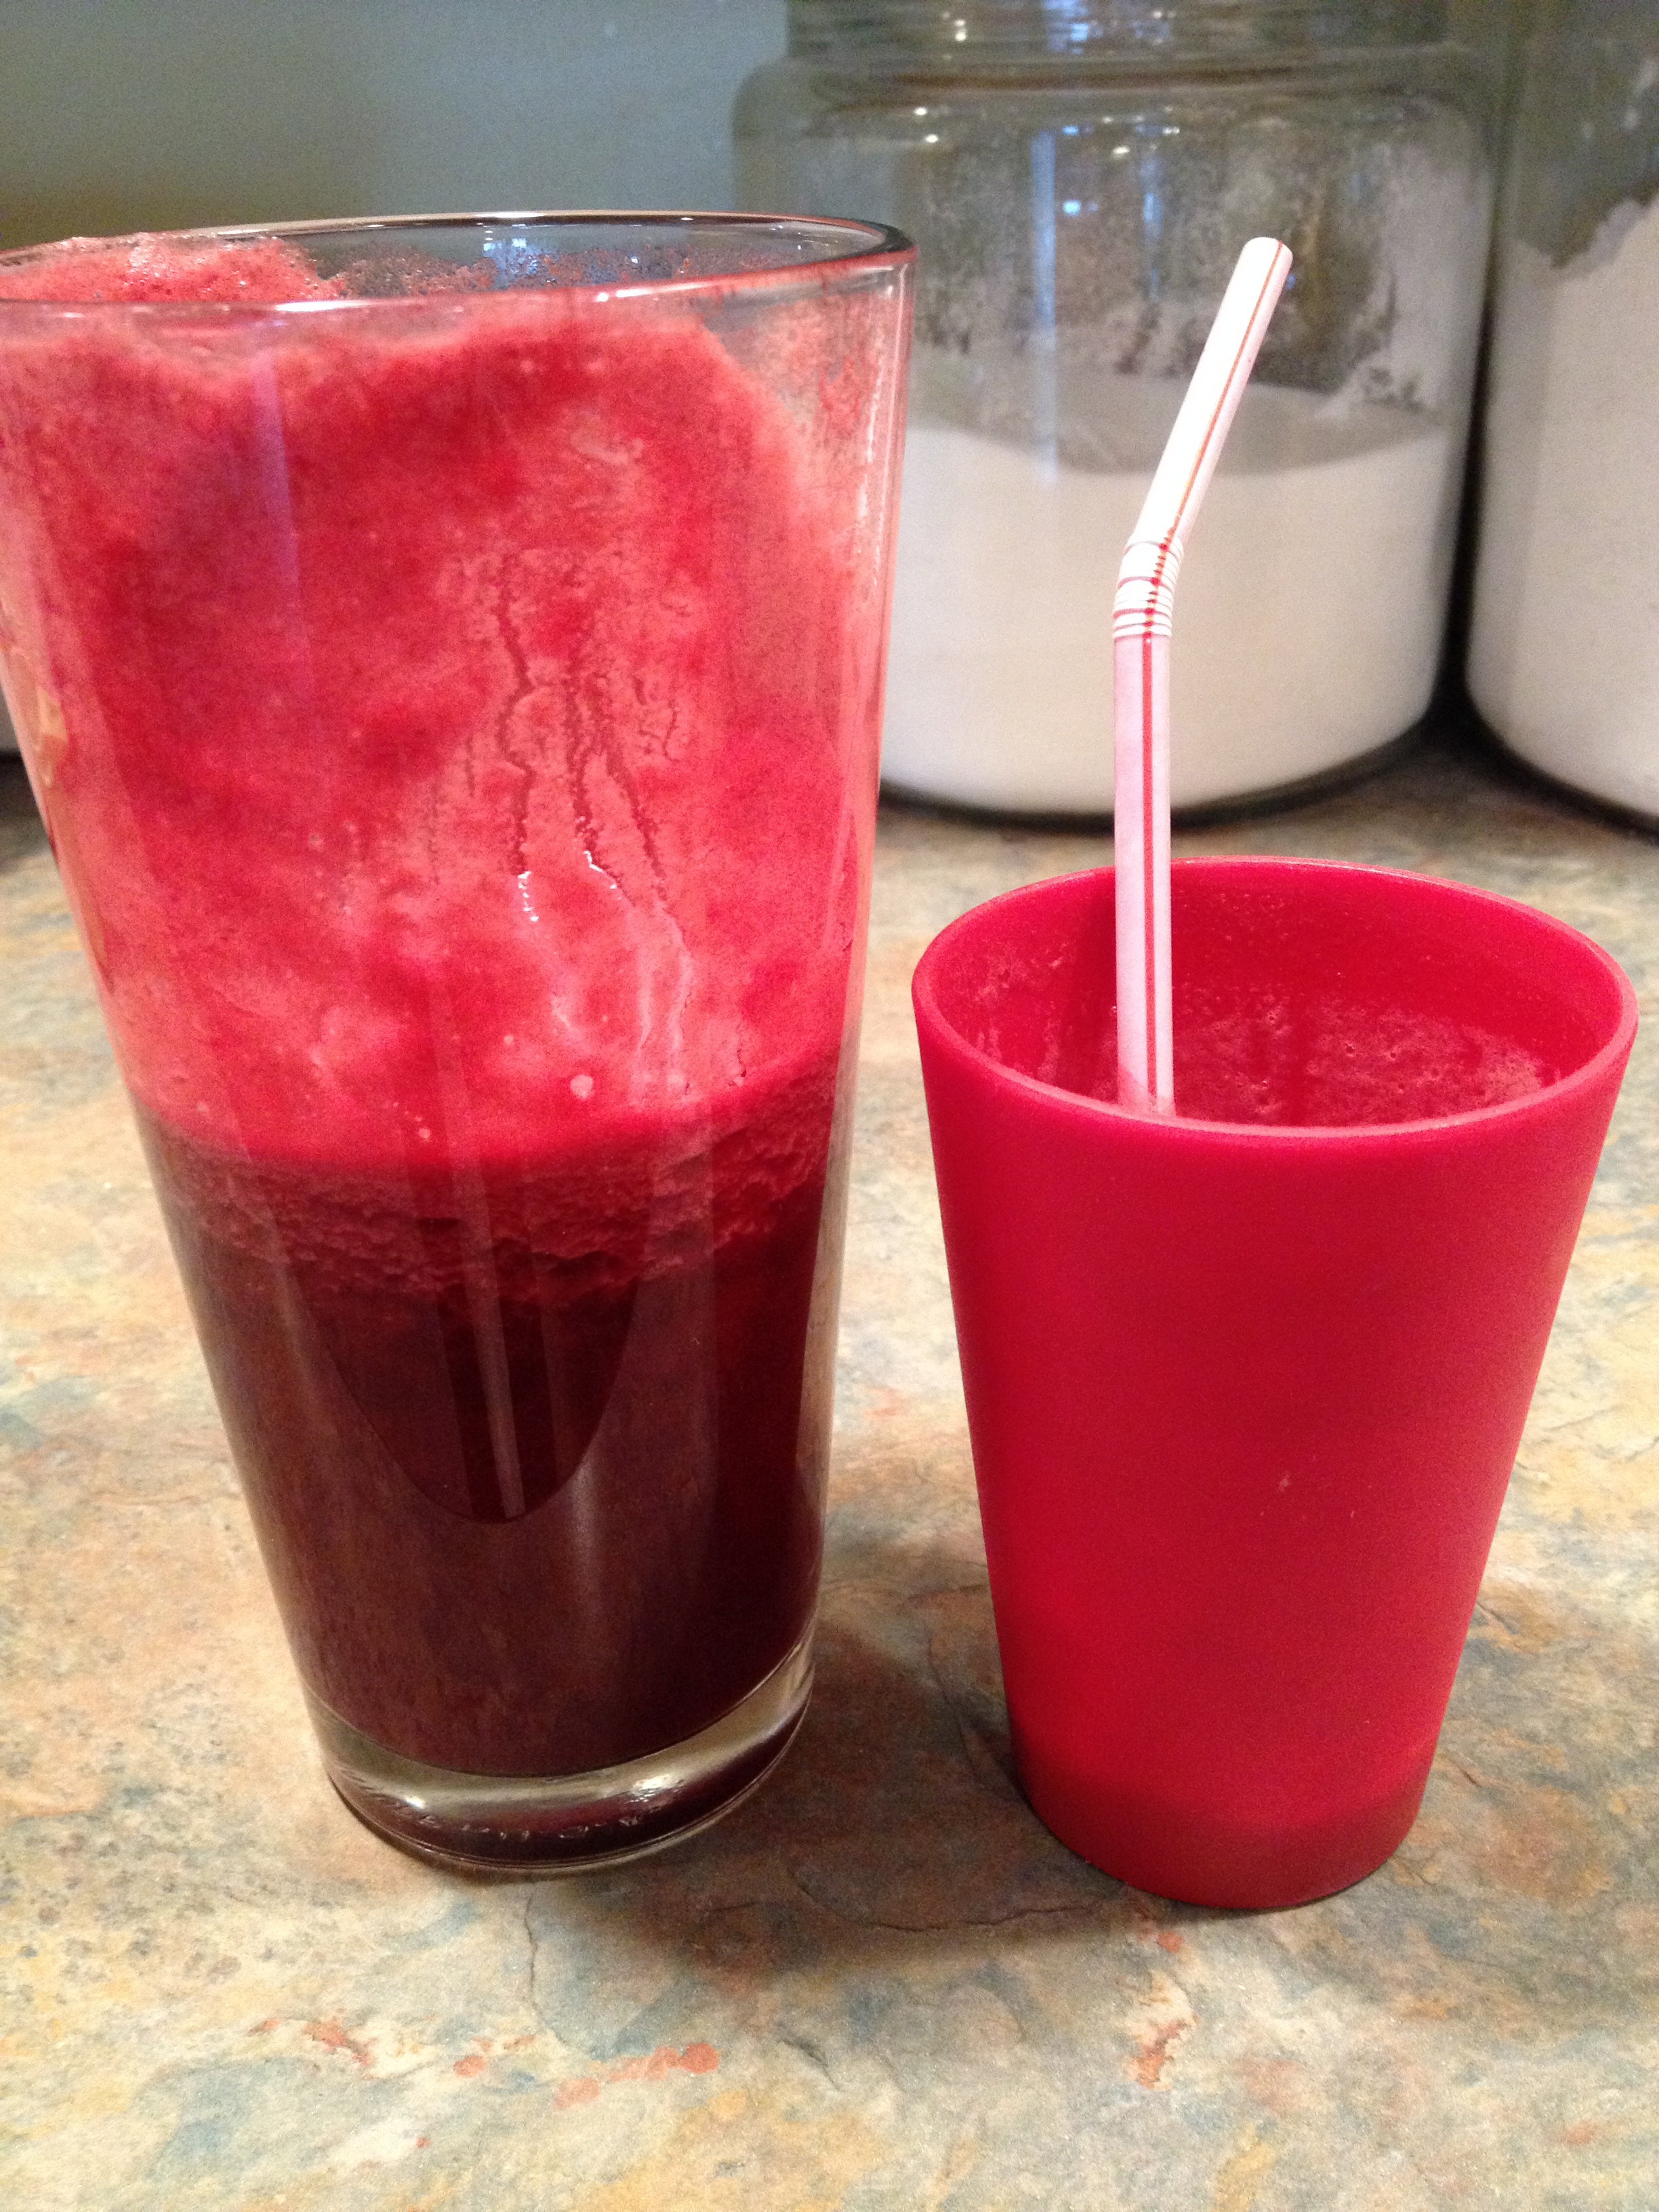
we all want to do the best we can to ensure good health; not only for the present moment, but for the long haul down the road of life. sometimes doing the right thing is a challenge, and I get that. sometimes with all of the hats we are donning and doffing… grabbing a healthy breakfast or lunch becomes an afterthought. you find yourself grabbing a quickie packaged something or other from the cupboard and mindlessly consuming it at red lights on your way in to the office. I am here to tell you that you deserve better. your body deserves better. and it’s as easy as bulking up on your produce purchases and allowing yourself 15 extra minutes in the morning, a few days per week. I am talking about JUICING. I know, I know…. juicing seems to fall under one of those, “oh it looks wonderful, but who has time for it” or “I’d probably buy the juicer and never use it” …and I’m here to body slam those negative thoughts. I bought a juicer on Craigslist for 60 bucks. Rewind… first I BORROWED a juicer from a doctor pal of mine, and test drove it for a couple of months. I was smitten. then, when she asked for it back, I felt as if I’d lost a friend! (the juicer) -and I knew I had to have one of my own. enter craigslist… and the very next day I was juicing once again. the great thing about juicing, is that you can easily consume things that you would NEVER be consuming in their whole form at one sitting… unless you are a big fat bunny rabbit. see visual below….
vegetable forward
but somehow, when you put it all together, balancing the veggies with a nice tart apple and a chunk of citrus fruit… it tastes amazing!! keeping in mind, more often than not, the color is less than desirable. my hubby equates it to pond water at times. However, that being said, if you throw a beet in the mix… prepare to drink, hands down, the most beautifully vivid liquid you will ever touch to your lips!! I was blown away by the bright bold hue of pure beet juice. not the purple watery liquid you strain from the can that inevitably stains your cutting board and counter… but PURE beet juice created from squeezing it mechanically. ((see below))
one raw beet will do it.
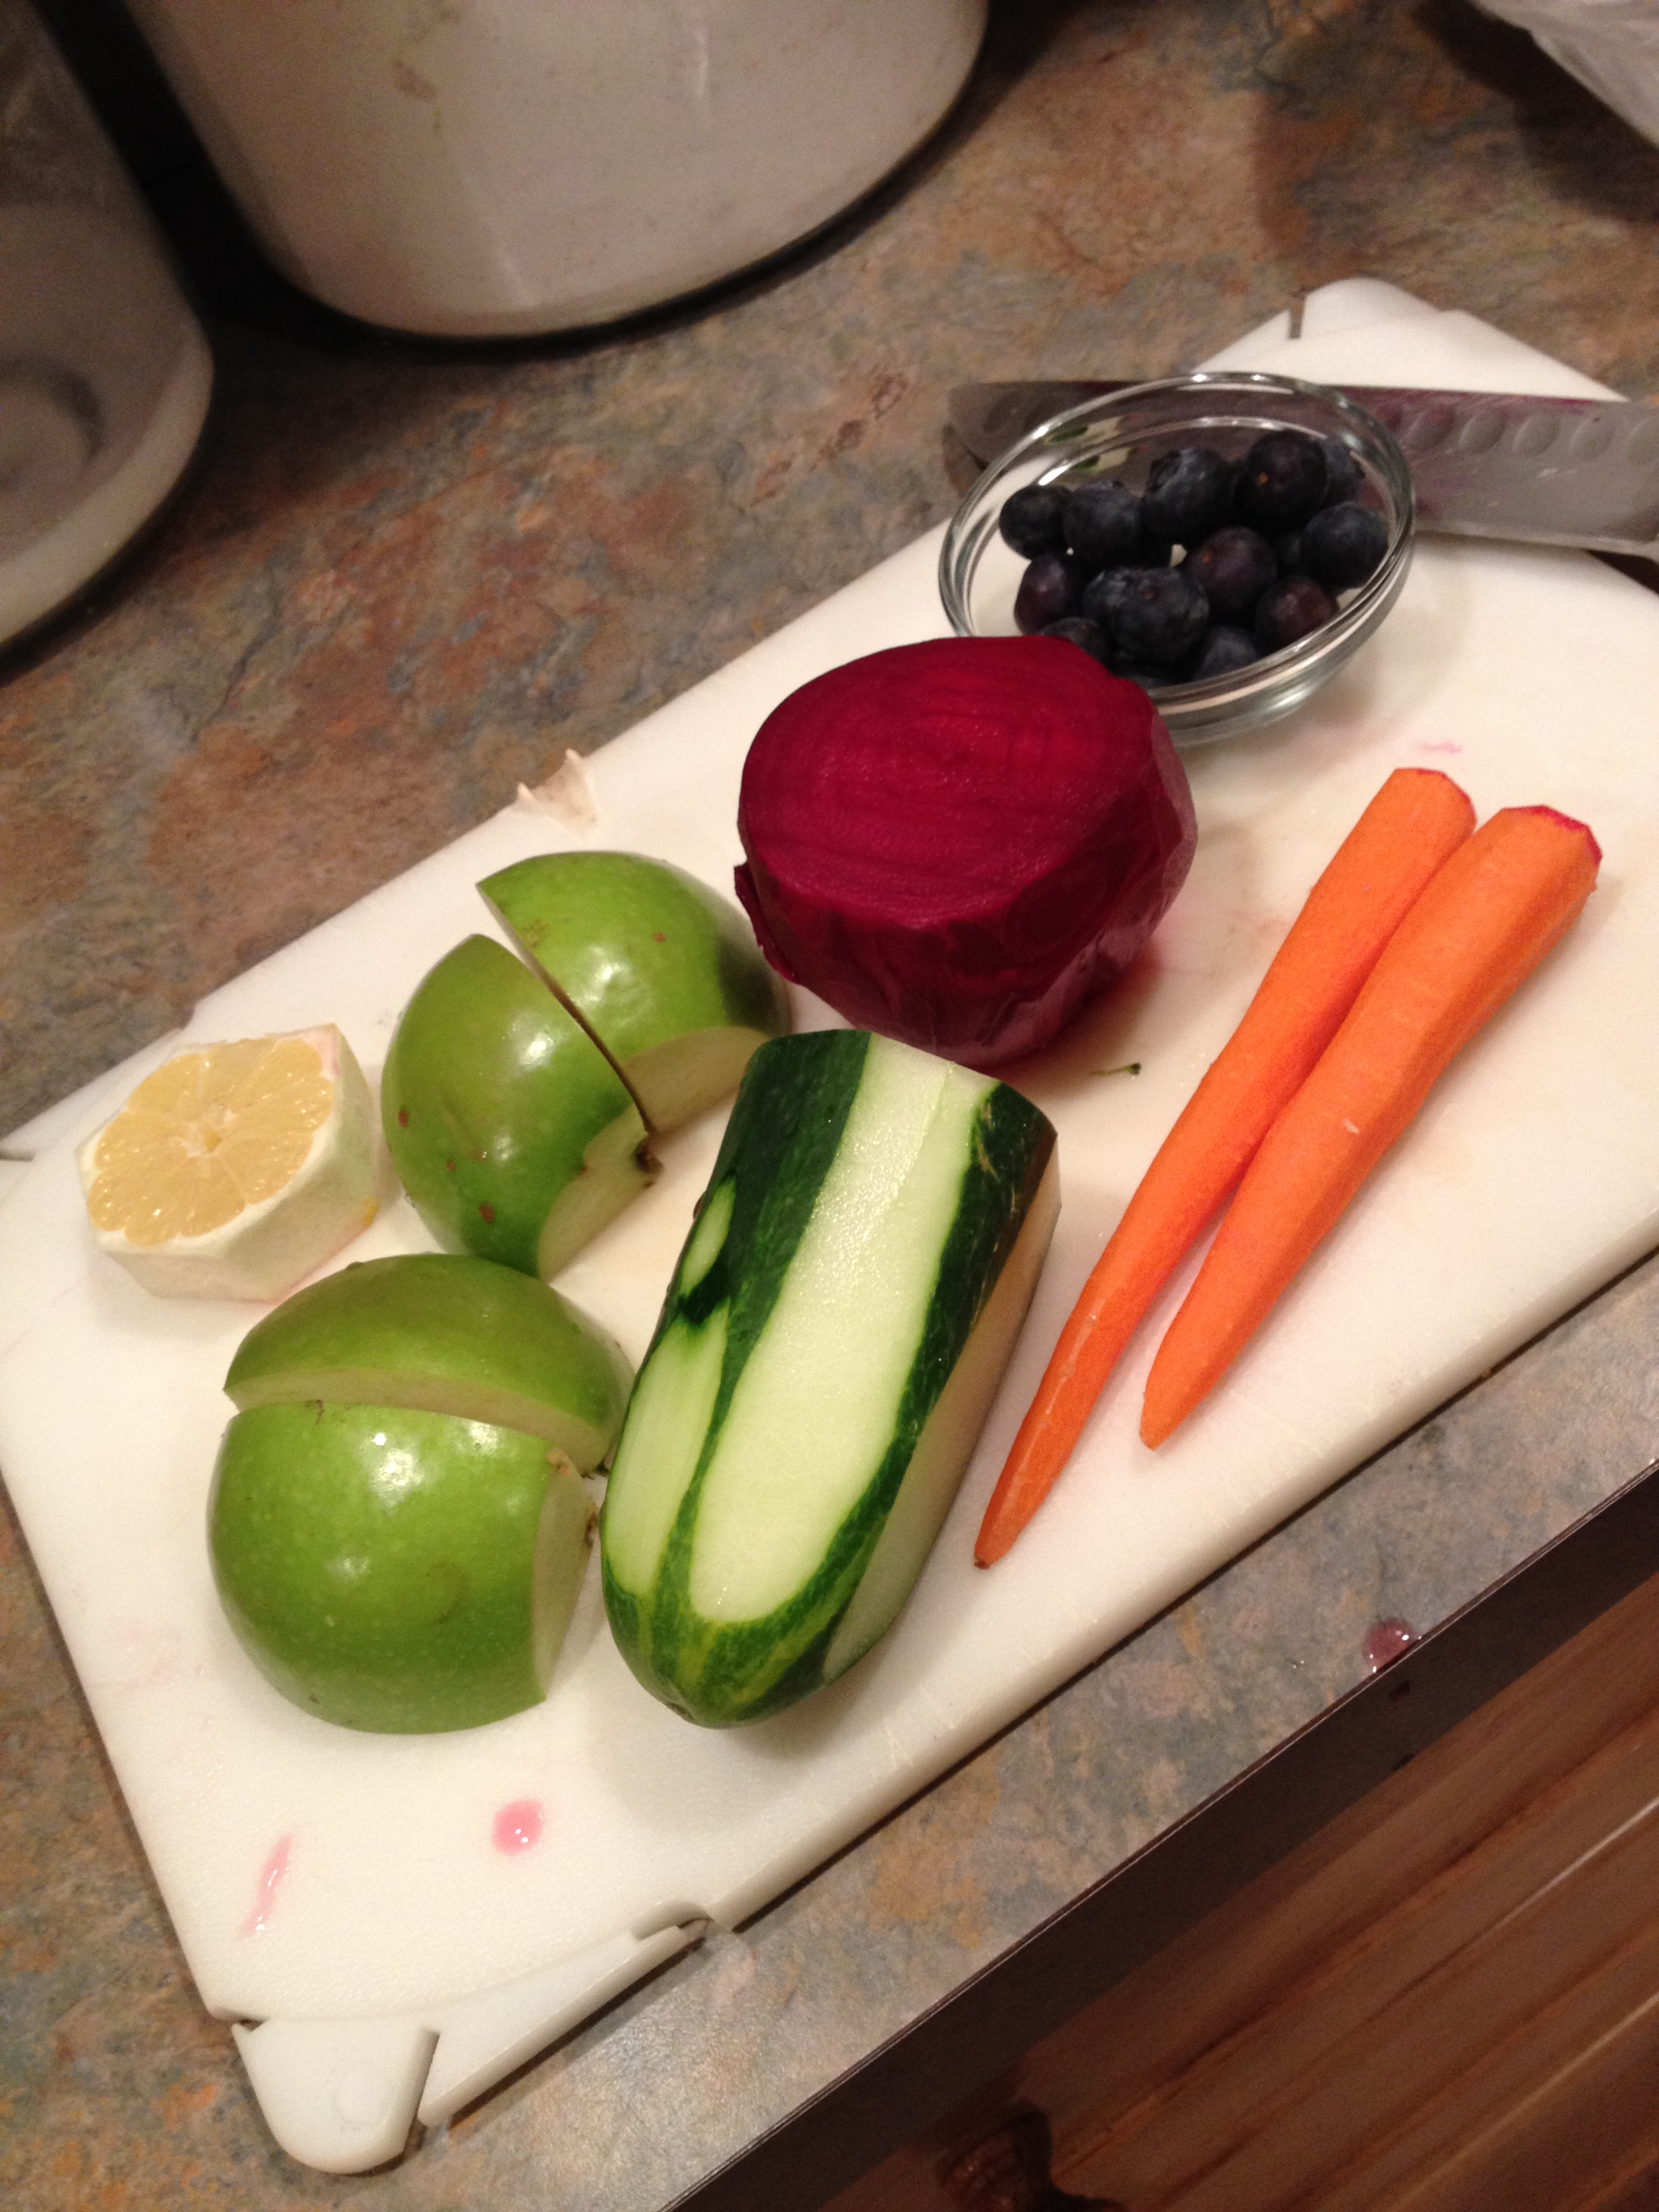
I shared this blend with my seven year old daughter, who loved that it gave her a PINK moustache! juice up fruits that are about to go bad, combine them with things that are wicked good for you, but that you may not want to consume on their own in their raw form… example, beets, kale, spinach, rhubarb, raw ginger, a big rip of parsley, the nice thing about juicing is that you can use the stems and all… I like to save the core of the pineapple, adding that into a mix for my sweetness one day, hence wasting less, and getting more from the pineapple than I did before! I also like knowing that the variety of items you see on my cutting board below will transform into a liquid that will supply me with over half of the vitamins and antioxidants I will need for the whole day! literally, after I drink my JUICED breakfast from my mason jar in the morning, about a half hour later I feel like I could take on the world! the energy is SO PURE and SO FAST… you won’t even think about eating again until lunch time. juice your mix, and place in a mason jar with lid secured. stash in your work bag. when you arrive at work, give it a shake and sip away (or gulp like me) for good health!! you just gave yourself a breakfast like no other. I call it Rockstar food. OK time for another pic.
one of my favorite mixes.
OK so let’s talk health benefits. oh and before I do that… you will have the critics who will say, YES but you are missing out on all the fiber by juicing!! -and to them I reply… take the back carriage off of your machine, and whisk in a few tablespoons of the lovely pulp to your beverage! VOILA! there you go. this pulp helps make an AMAZING COMPOST by the way. waste not. so for starters, there are the vitamins. A,D,K,C, all of the B’s, chlorophyll, (linked an amazing little article there for ya’ll) enzymes, phytonutrients (help us fight off disease), and the list goes on and on. the take away point here is that you are feeding your body, your cells, your ‘machine’… LIVE FOODS… foods that nature created, and that your body knows EXACTLY what to do with! –and your body knowing exactly what do with these foods, is the EXACT energy boost that you are FEELING almost immediately after drinking these juices!! we stress our bodies to the max these days, not only physical stress and lack of sleep and sometimes lack of activity, but mental stress as well. money troubles alone are enough to wreak havoc on our sense of well being and our overall body health. stress ends up breaking down and deteriorating our cells, thus causing (or opening us up to) degenerative disorders. this is one small way that you can fight back and do something great for your body. for your health and well being. I can GUARANTEE that not a one of you, after juicing for a couple of days, will utter the words- “man I wish I wouldn’t have drank that”, or “boy I sure feel lousy now”…. WON’T HAPPEN. but did you ever feel that way after eating a big donut or two?? uh-huh. how about after eating a pop tart and a diet soda? you’re feeling me. those food are offering you nothing, yet we waste money on them and worse yet, consume them. I challenge each reader to take ownership of your body. become accountable, and watch how your life changes. show up each day. think about what you are putting in your mouth and what it has to offer you. I am not saying you should deprive yourself of things you enjoy eating… treat yourself well. I eat a frozen snicker bar next to the pool in the summer sun probably twice a week! -and I don’t think twice about it. you know why?? because when you make healthy decisions a majority of the time, you’re allotted those freedoms! it’s a give and take, and the old adage, everything in moderation is key. but JUICING…. you’re gonna like it.
“Magnesium is Nature’s own calcium channel blocker. When enough magnesium is around, veins and arteries breathe a sigh of relief and relax… Want to literally keep your heart happy? Eat lentils.” – whfoods.com
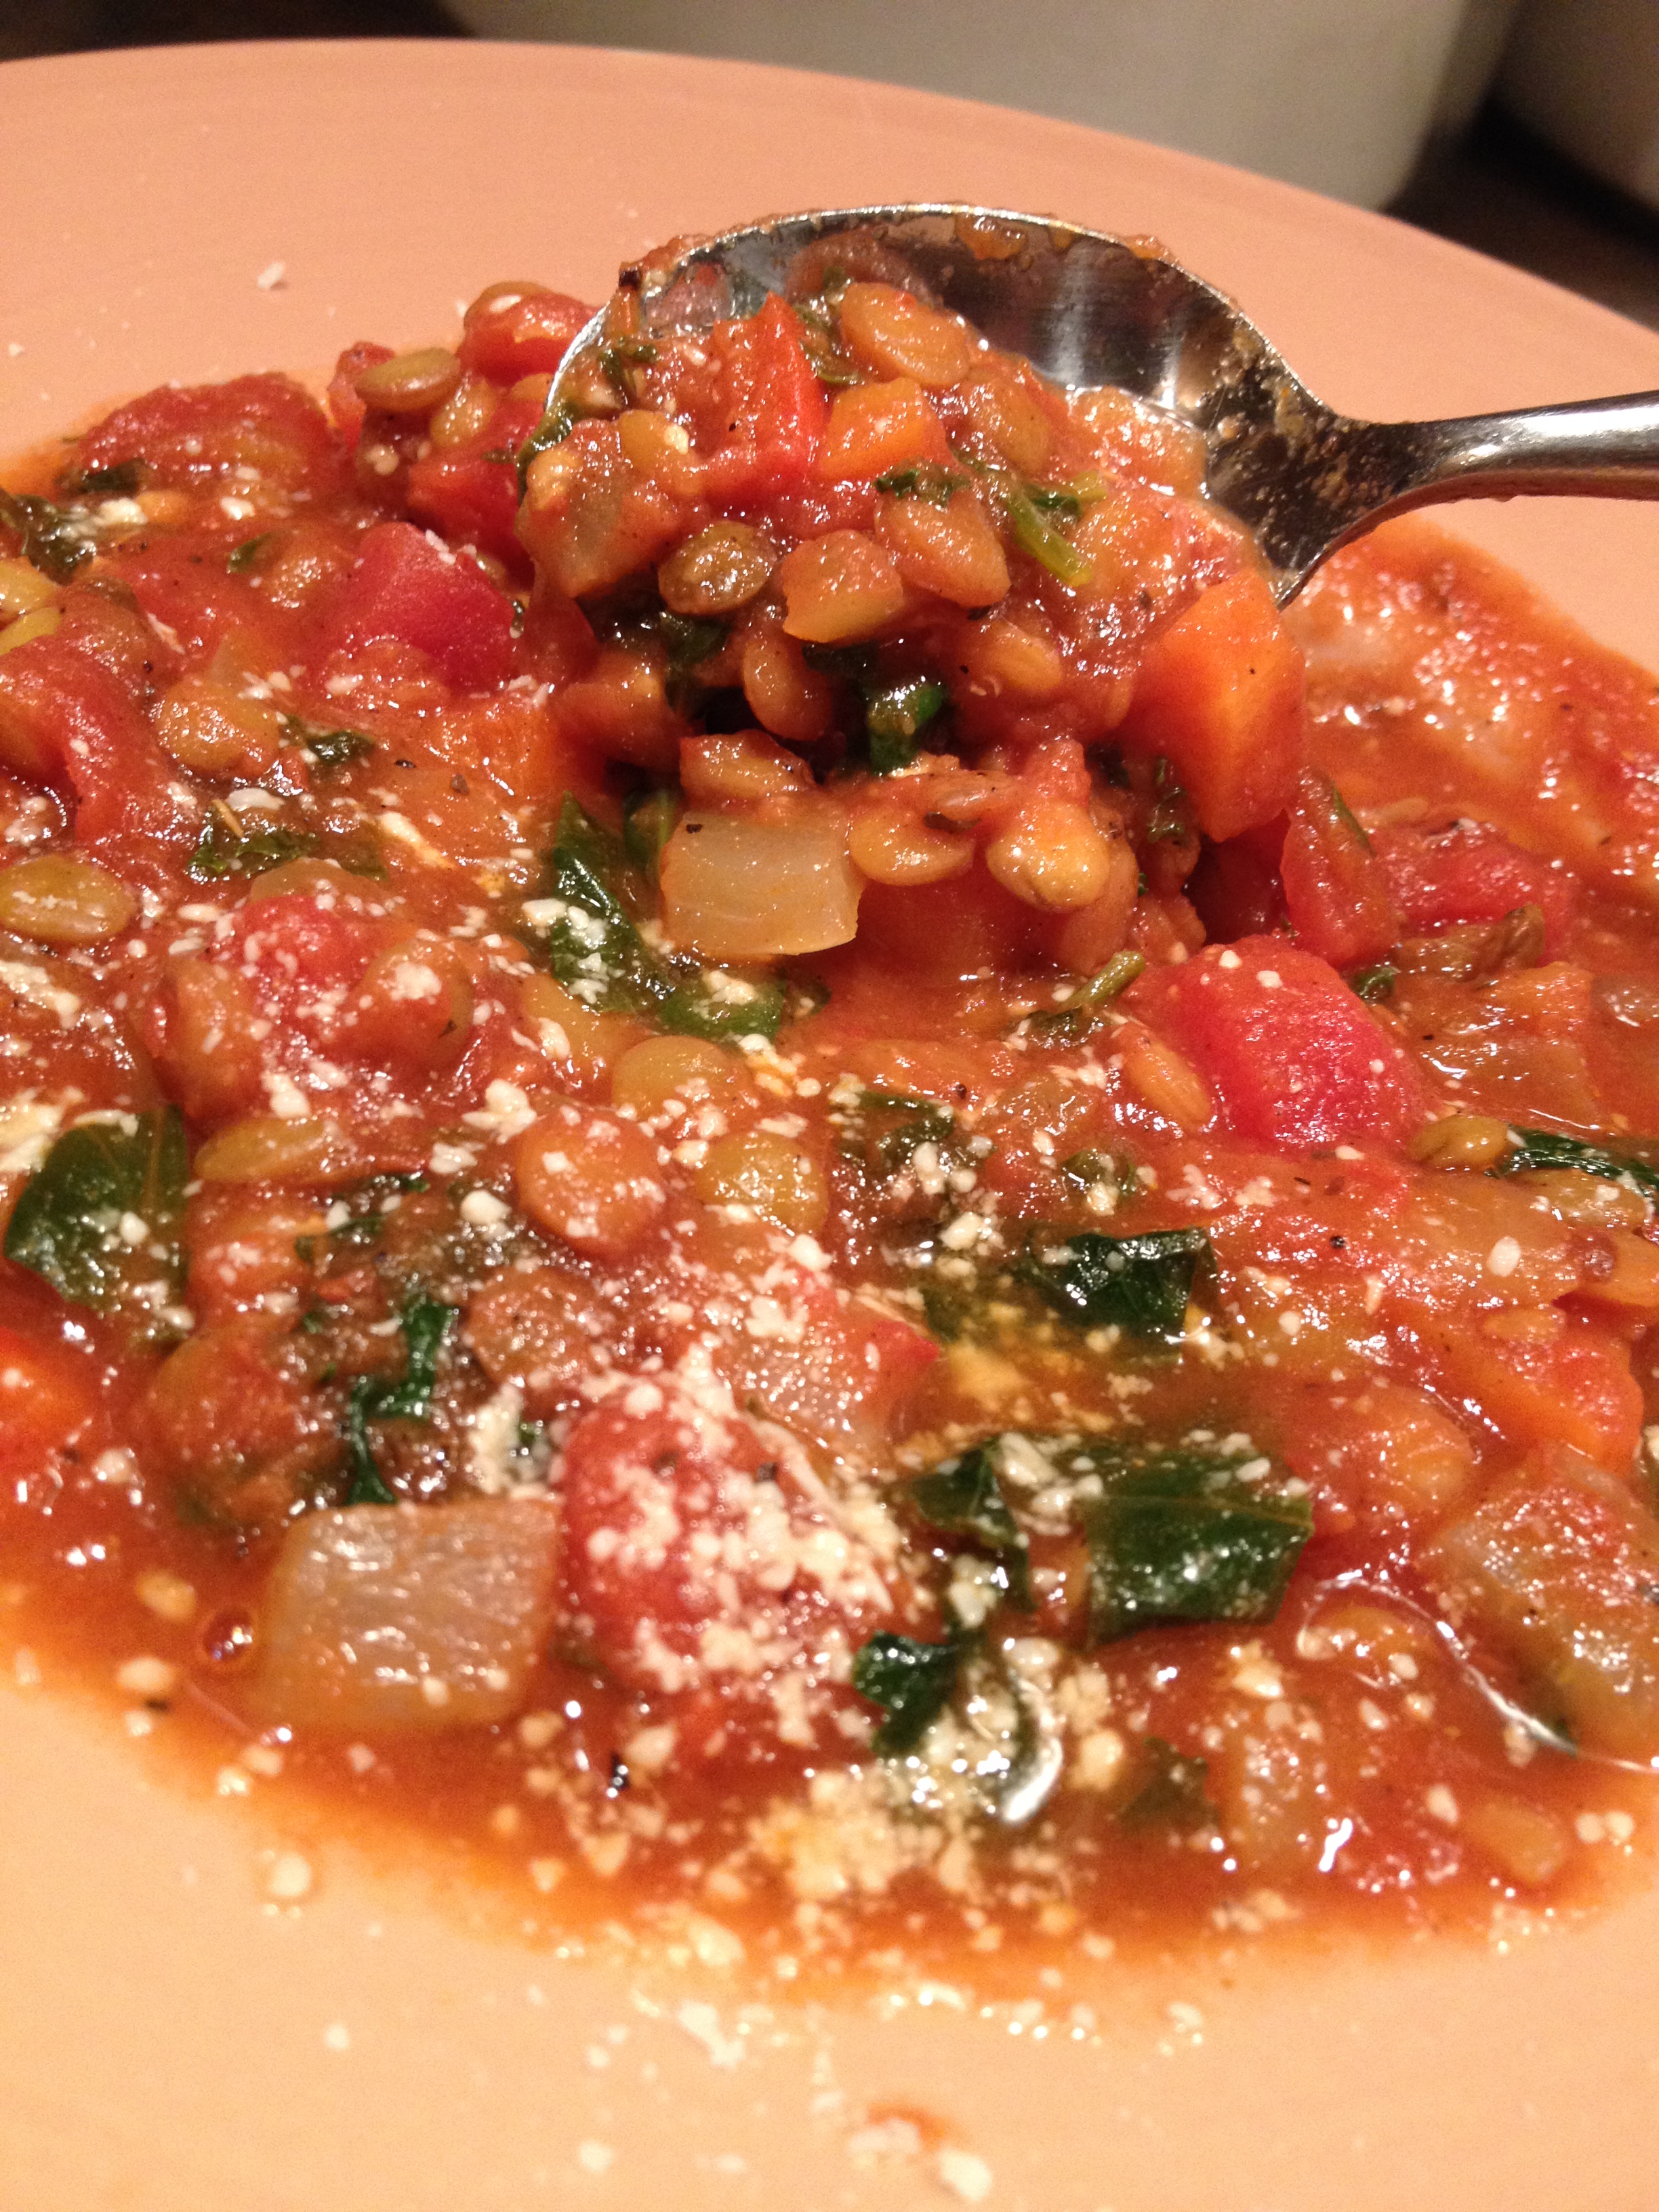
about a month or so ago, I decided to cook with lentils for the first time ever. i am heavy with regret that i waited so long. why? because they are a nutritional powerhouse in a tiny adorable package… that’s why. Health magazine touted them as one of the five healthiest foods we can eat. they are one of the highest protein rich legumes out there… packing a whopping 26g of protein. they are fiber rich, thus cholesterol reducing, and brilliant for weight loss, given their low fat and high fiber content. they pack iron, B vitamins, zinc (cold season BFF) and an outstanding 120% of Folate! so yeah, i fell for lentils. it was a beautiful thing, and I believe I picked the absolute perfect dish in which to begin this life-long relationship… an Italian lentil soupy stew. i decided what I wanted to be in the stew… thought about how I should bring it all together… and fast forward spoon to mouth, the bright – bold flavors blew me away! this pot of yumminess will last you several days, and feed you (and a willing friend) lunch and dinner (and heck even breakfast one lazy Sunday if we’re being honest) for all of said days. this recipe warms you in the fall and winter, and is bright and refreshing enough to eat in spring and summer as well while enjoying a book on the patio! The flavors marry, and it truly keeps getting better. it can even be served atop scrambled eggs with some crunchy baked pita wedges to help get every last bit to your mouth. the fat content on this is next to nothing… only coming from the little bit of olive oil you begin with. so eating a bowl late at night while catching up on your favorite TV is definitely not out of the question. that is, as long as you have a steel stomach and will not be up half of the night with heartburn!! you were warned. ok lets get on with it… this dish comes together in about 20 minutes with all of the chopping and can opening- and it cooks for 30 minutes. it is a one pot meal- aka all cooking done in same pot.
WHAT YOU NEED:
large onion (diced)
3-4 carrots (small dice)
half of a red bell pepper (or orange or yellow- NOT green)
3 cloves of garlic- peeled and minced
2 T olive oil (maybe more- go with it)
2 tsp. chili powder
1/2 tsp. oregano
1/4 tsp. paprika
1 tsp. cumin
1 bay leaf
1/2 tsp. coriander (if this is the only thing stopping you from making this dish if you don’t have it- leave it out!! it will be fine!
1 tsp salt
1/2 tsp. black pepper
large handful of baby spinach (maybe a cup packed) – roughly chop
2 cans chicken broth (sub vegetable broth for vegan version!!)
1 cup of water
28 oz. can diced tomatoes
28 oz. can crushed tomatoes
1 cup of lentils (i used greenish brown regular lentils)- soak them in warm water while you prep and then rinse well prior to adding.
a splash of lemon juice and a small handful of chopped fresh flat leaf parsley stirred in at the end really brings this to life… but don’t beat yourself up if you don’t have either. it is SPOT on without. 🙂
HERE’S WHAT YOU DO:
add some olive oil to a dutch oven. prepare your vegetables as outlined above, and open your cans so you are ready to move forward. get your lentils soaking in a dish in warm water. turn on your pot and heat the olive oil over high heat. add your onions, carrots and bell pepper. saute over med/high heat for five minutes or so- stirring often- add garlic near end and cook a minute longer. onions should begin to soften and turn a slightly brownish color. add your dried spices and saute a minute longer. at this point you can add your tomatoes, broth, water and bay leaf. drain and rinse your lentils a bit, and add them into the mix. bring mixture back up to a boil- and then cover- leaving a small gap in the lid. reduce heat to medium low- and set timer for 30 mins. stir ONCE during cooking. after 30 mins- remove lid and stir in your spinach. (plus parsley and lemon squeeze if you are going that route.) at this point it is done and can be served up in a nice shallow bowl. i like to let it sit, uncovered on the stove for another 10 mins or so- off the heat – just to let it rest after all of that hard work. sprinkle your serving with some parmesan cheese and serve with a nice piece of fresh garlic bread for over the top enjoyment. also good with some simple crackers alongside- or straight up with nothing at all. store in fridge (in the pot if you wish) for up to four days. Enjoy!
“A healthy snack in minutes… literally… you won’t believe how easy it is.”
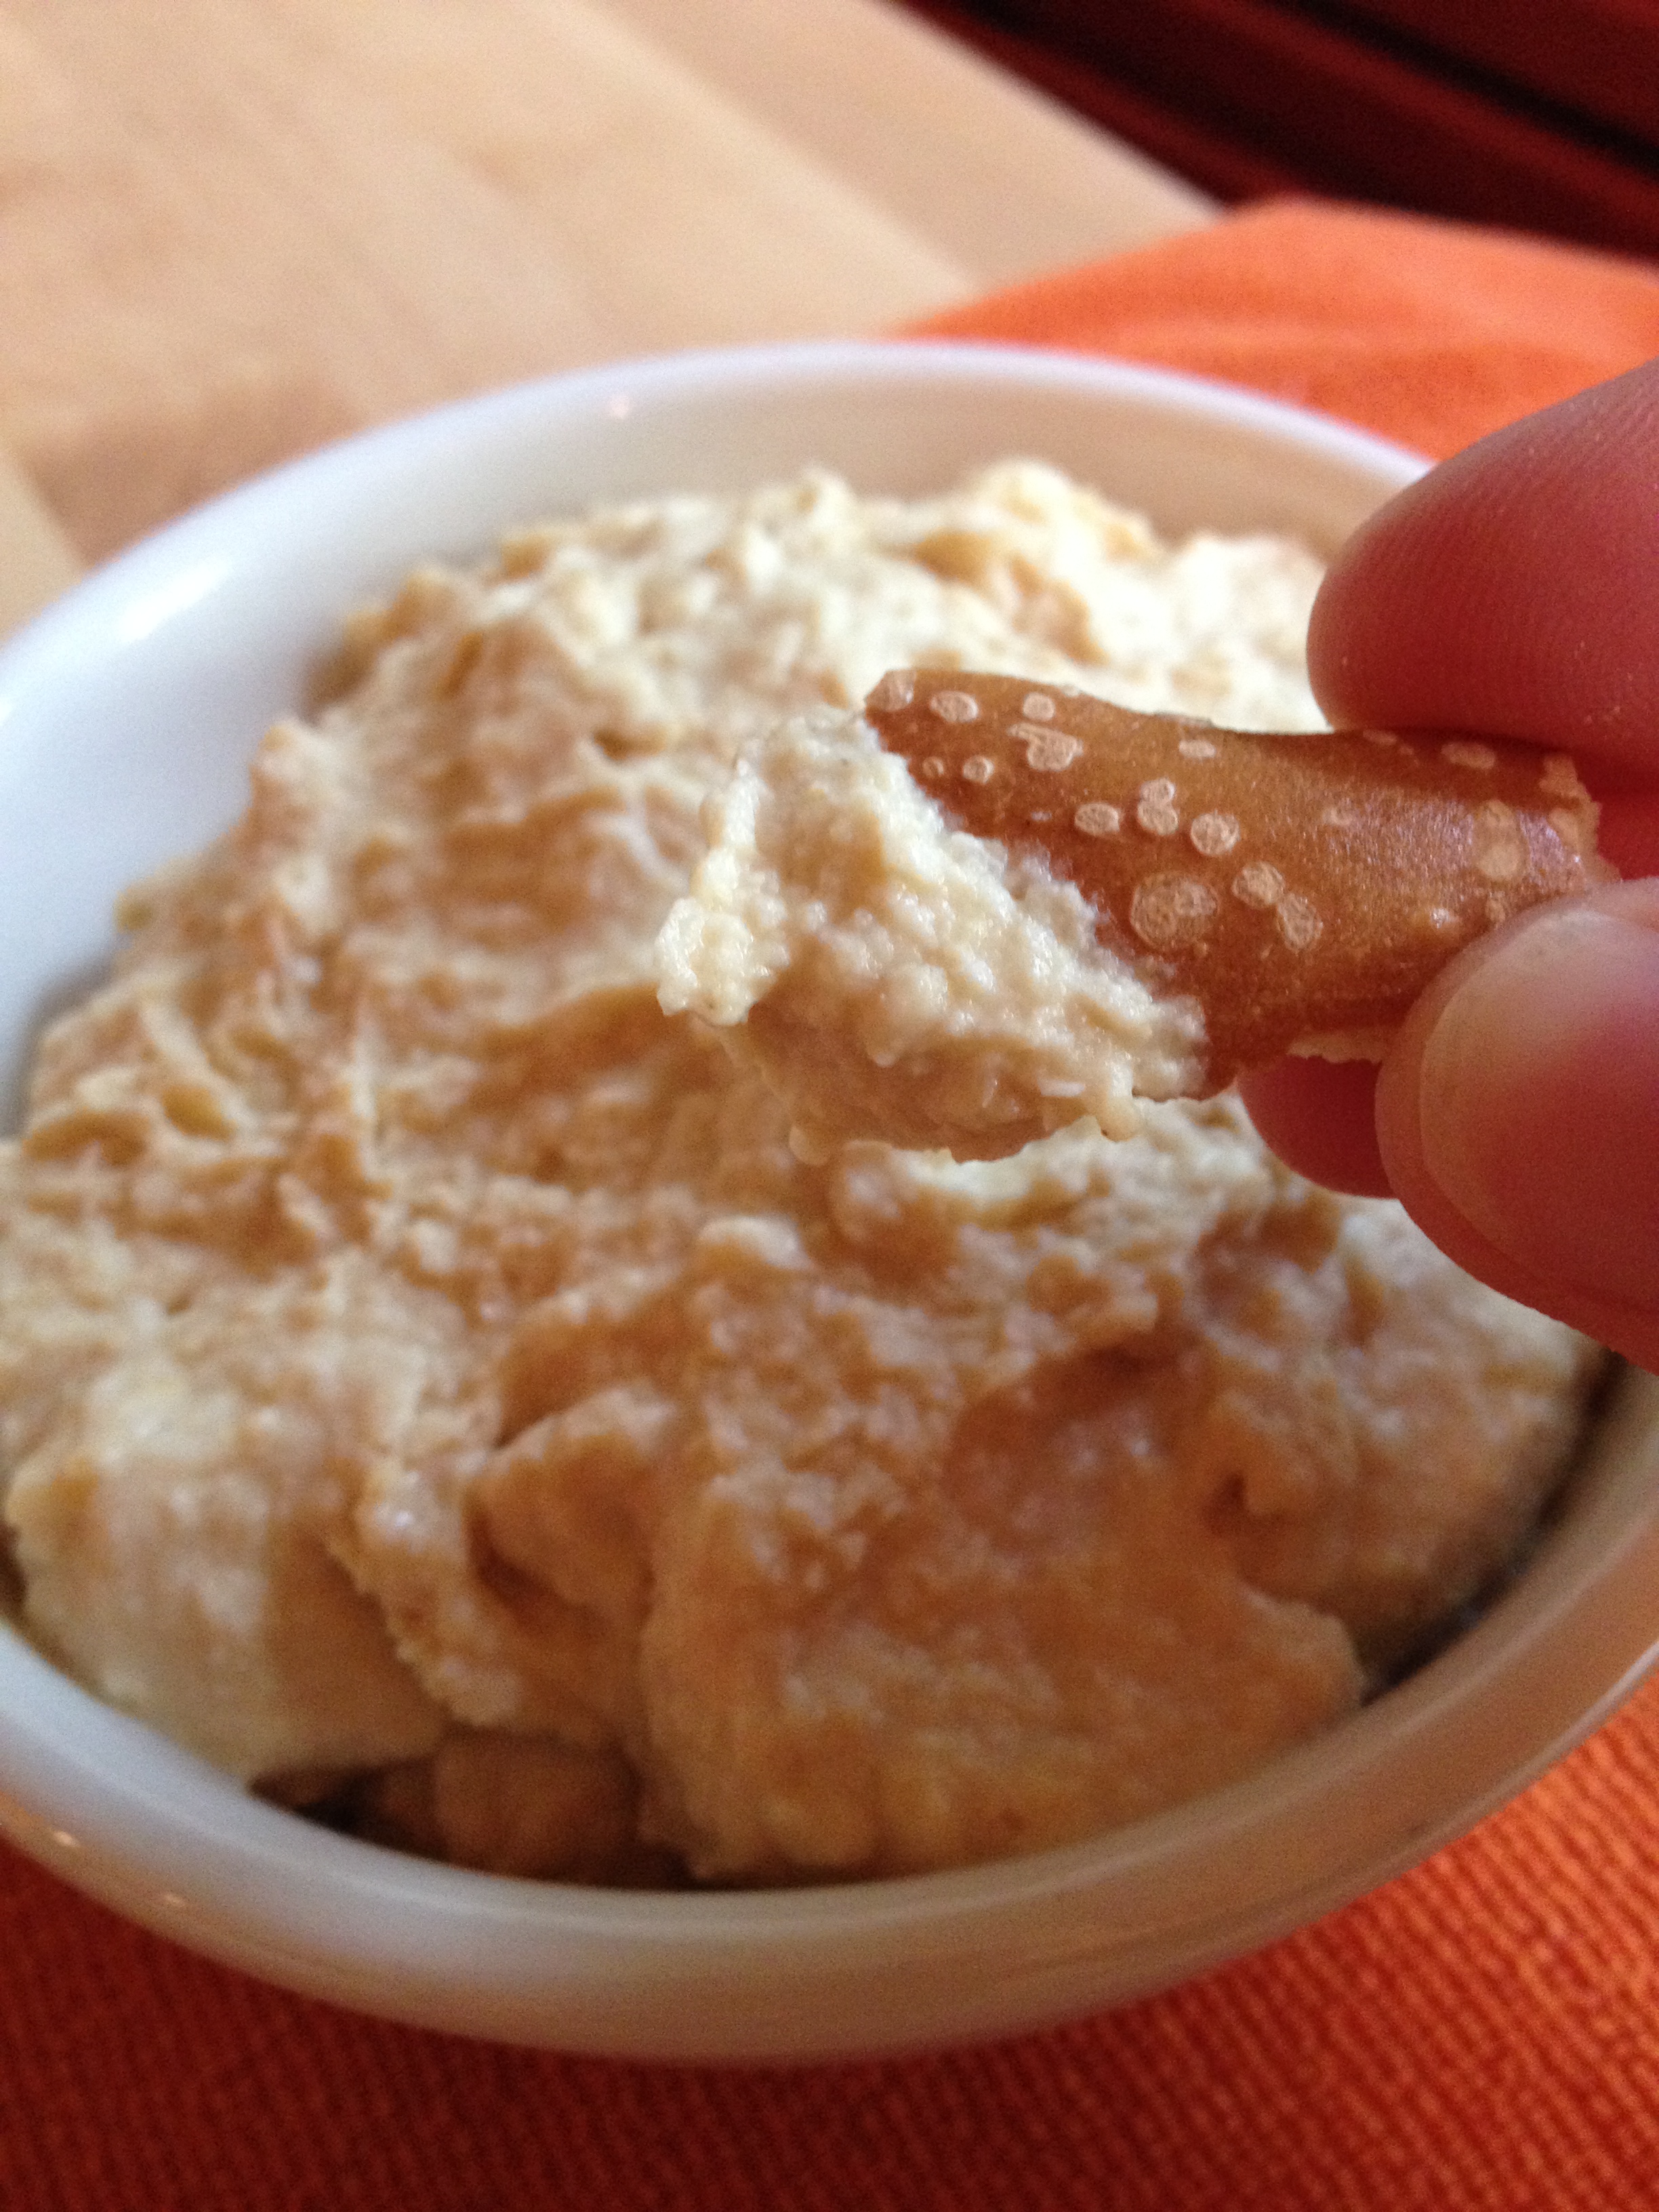
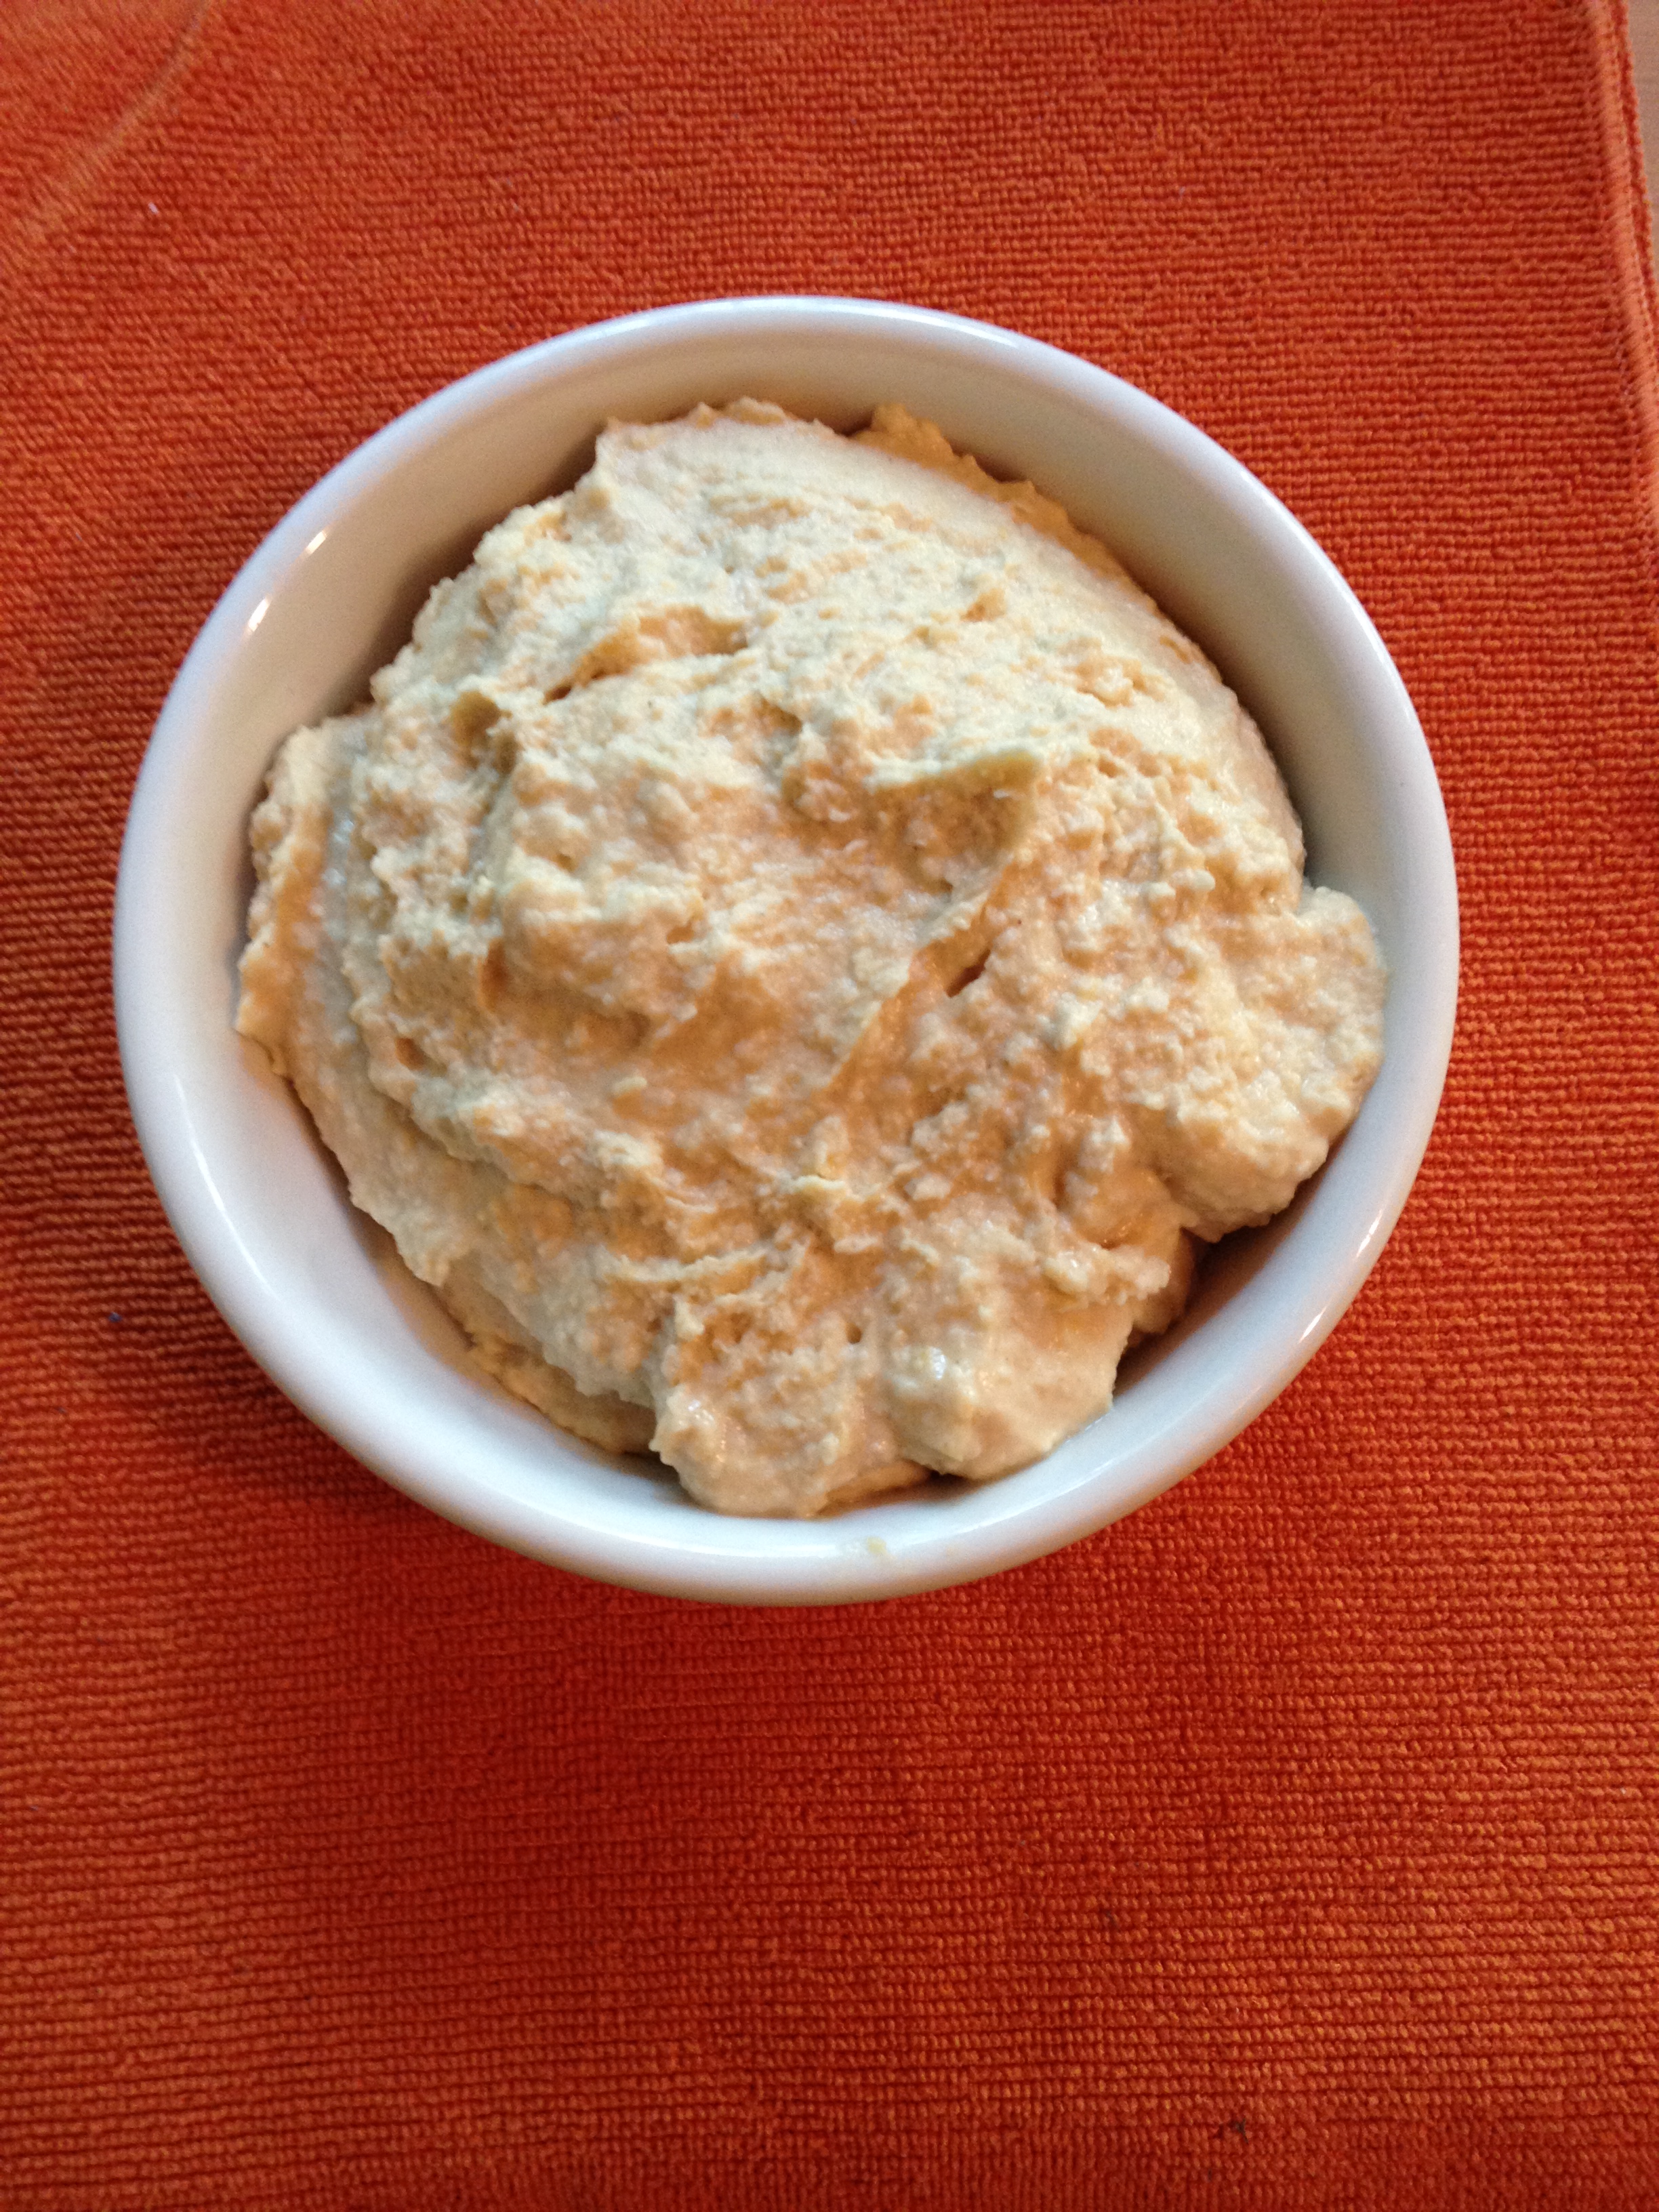
The first time i made hummus two thoughts popped into my head. one- – you have got to be kidding me… this easy??!! there has to be something else, some complicated step…. and two- – i will never ever pay 4$ for a small container of hummus again!! Hummus is one of the most versatile dips/ condiments… call it what you will- out there today in my opinion. it can be your first layer when building a veggie sandwich or pita, it can be carried from dish to mouth on pretzels, carrots, zucchini strips, bell peppers, celery… the possibilities are endless. use it instead of mayo on your next chicken sandwich or wrap and you have saved yourself some fat and added some protein! the fat that hummus does contain comes from the olive oil and the tahini (ground sesame seeds) which are the heart- healthy fats you should be getting more of anyway. hummus is a staple in Middle Eastern diets, but it has certainly gone mainstream over the past few years, so much so that it is served weekly in my daughter’s elementary school lunchroom as “ha ha hummus” ! (i love it) the taste is very distinct… even i will admit that- but somehow, it works. it is delicious, and becomes as addictive as those packaged sour cream and chive dips we all grew up noshing to our heart’s content (or discontent, lol) with greasy potato chips at every family gathering. chickpeas are the main ingredients in hummus, also known as garbanzo beans, and they are truly a staple in most vegetarian and vegan diets today. they have no cholesterol, and in studies have actually been shown to prevent the build up of cholesterol in blood vessels. they are high in protein, and have no saturated fat. they are both filling and satisfying at the same time, and can be cooked in with rice or stews or thrown on top of salads – taking the place of meat with ease. enough about chick peas. let’s get down with the hummus.
INGREDIENT LIST:
one can of chick peas (organic if able please)
one bottle of tahini (you only use a quarter cup- this will last for six months or more in your fridge- shake well before using)
olive oil
garlic cloves
lemon juice (fresh if able please- one lemon will do- put the rest in your water for the rest of the day)
salt if desired
OK HERE’S WHAT YOU DO:
get out your food processor or heavy duty blender (i’ve never made it in the blender, but i’m sure it would work out fine.) Open and rinse your can of chick peas. Add them to the food processor. Shake your container of tahini well, and add a 1/4 c atop the chick peas. Squeeze 2-3 Tablespoons of fresh lemon juice into the mix (careful not to add seeds). Peel and crush 2 cloves of garlic and add. Add 2 Tablespoons of olive oil. Add a generous pinch of salt if desired. Attach the lid and fire her up. process until smooth, adding water a Tablespoon at a time if you desire a more thin consistency. turn it out to a serving dish and enjoy!! store in an airtight container in your fridge for up to two weeks, stir well each time before snacking. this is the basic recipe… feel free to add some sundried tomatoes, using the oil from the tomatoes instead of the straight olive oil and adding a tsp of oregano. this would give it an italian flare. go greek with a half cup of feta instead of the tahini- and a cup of baby spinach leaves in place of the garlic. like roasted red pepper?? go there. the possibilities are endless. happy blending yo!!
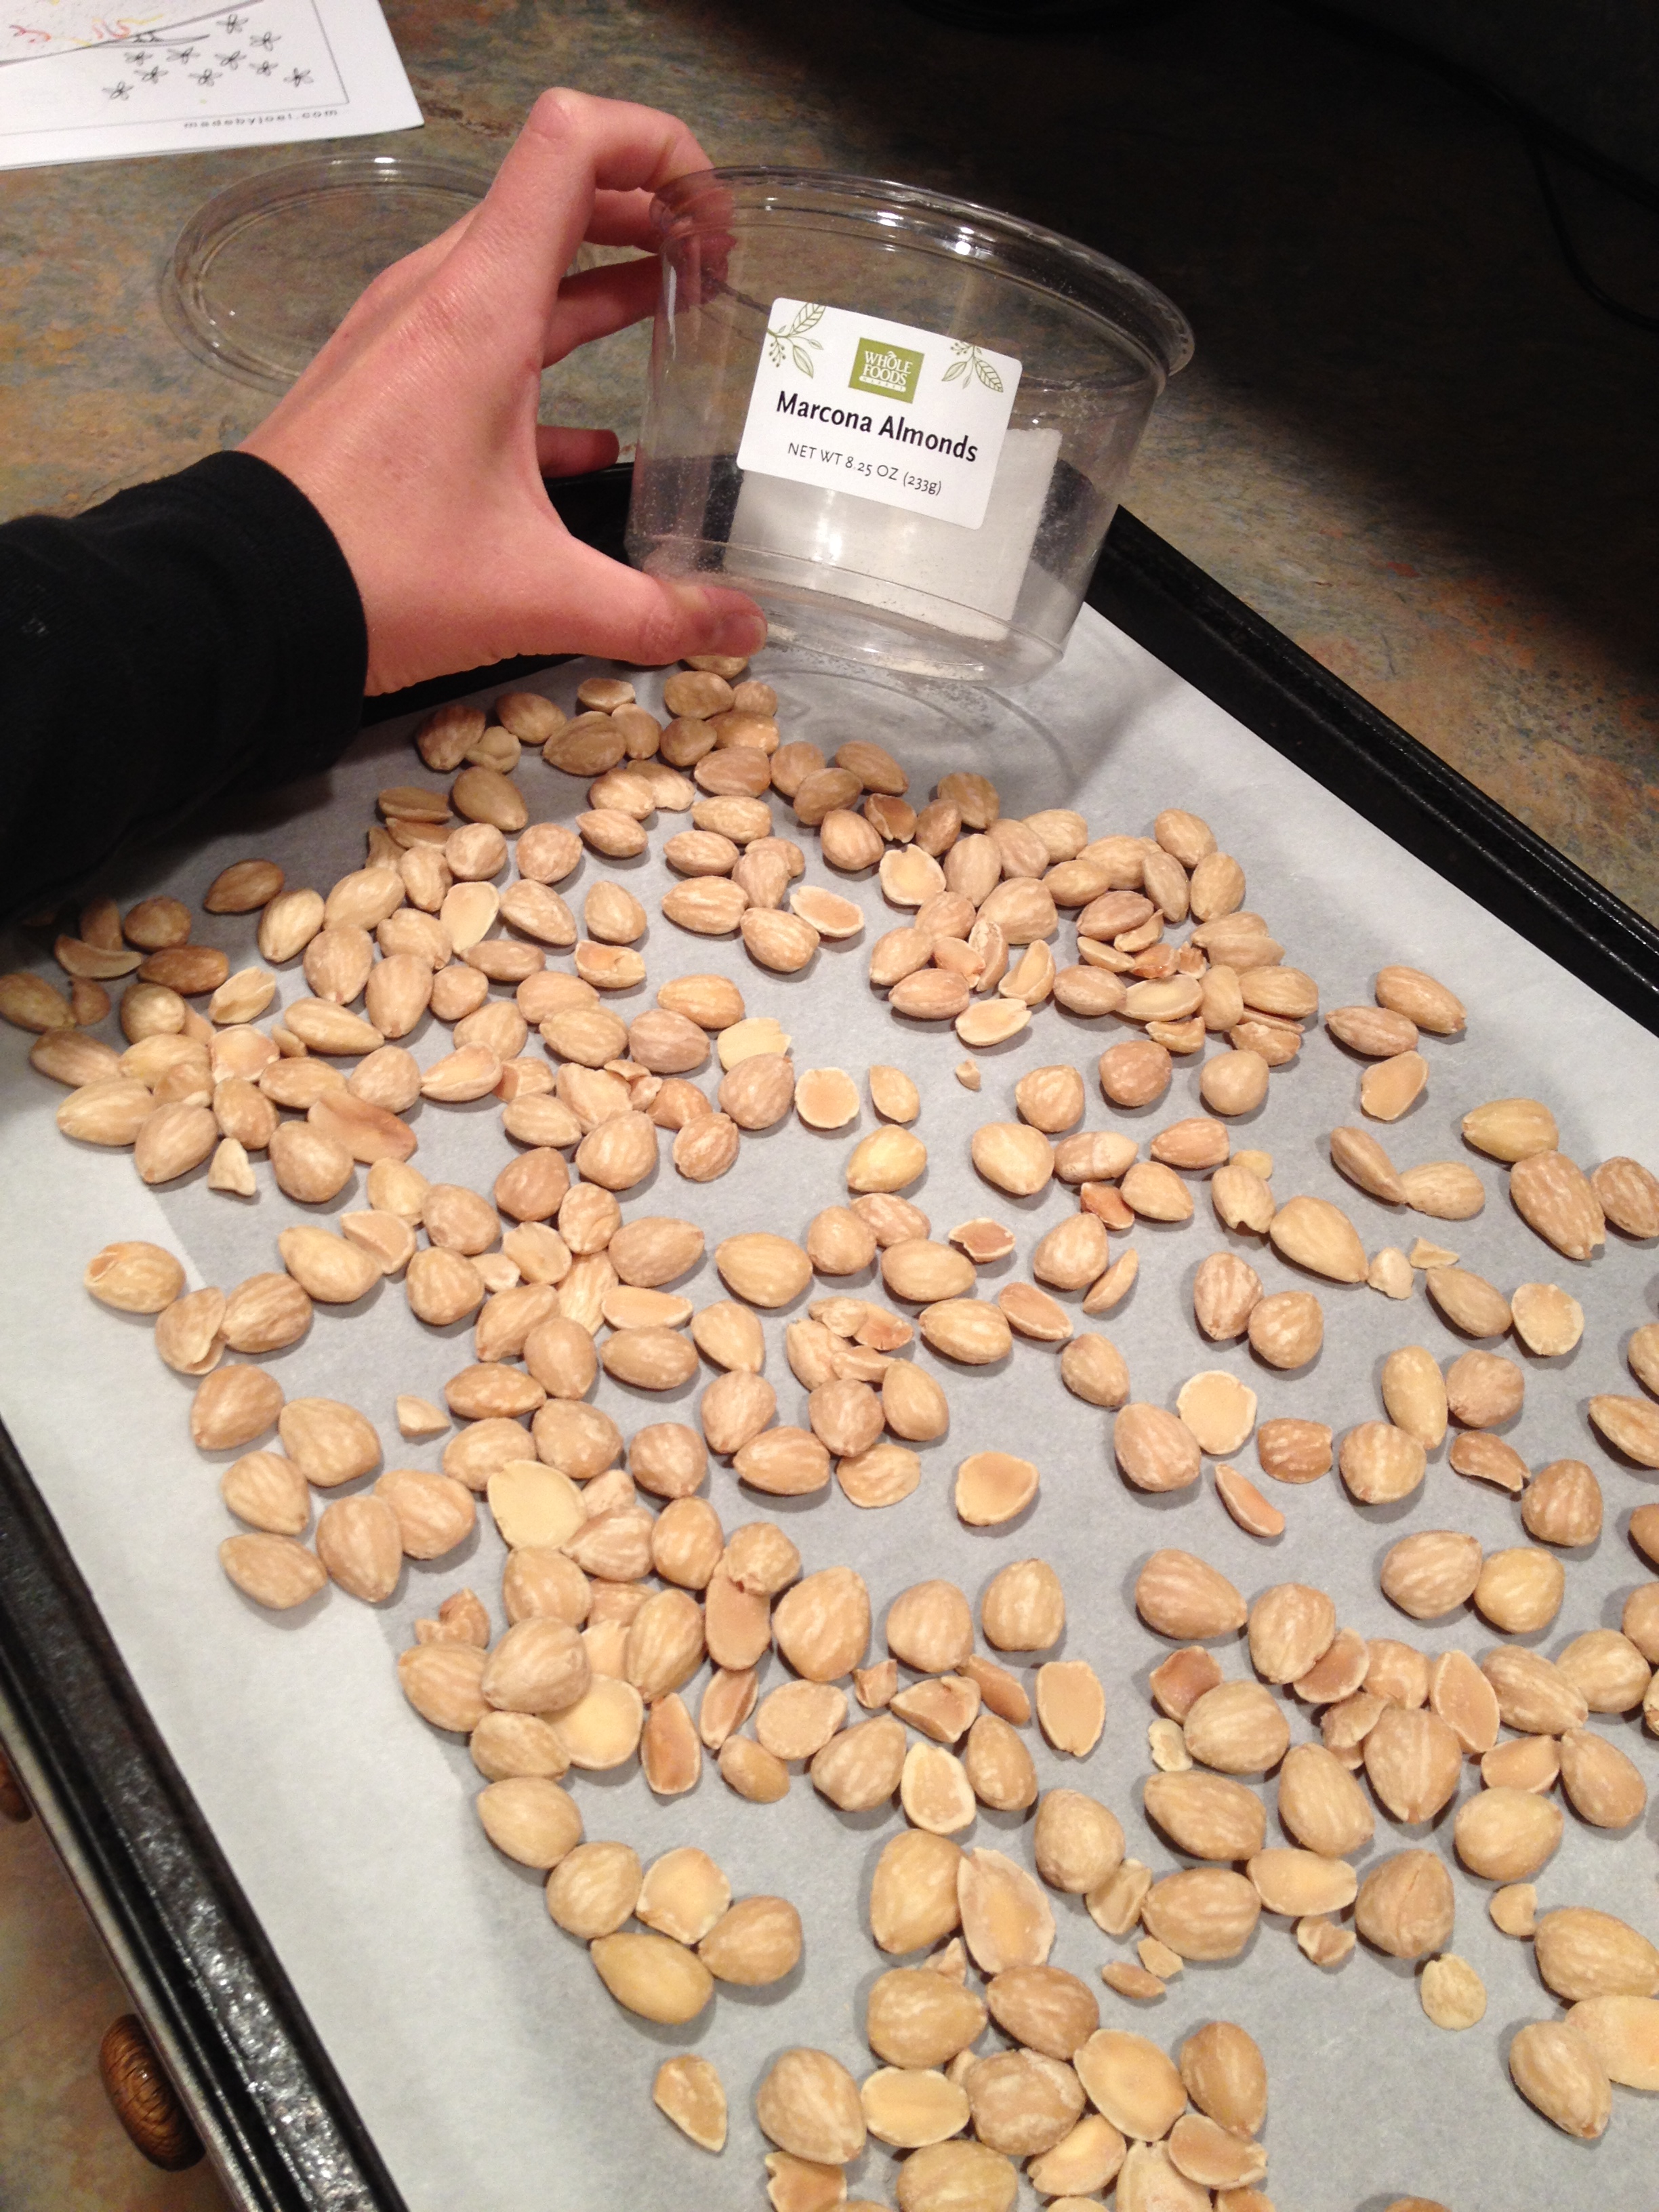
The first time I was introduced to Marcona almonds was in the middle of a typical crazy busy shift at work. My co-worker had a bag of them from Trader Joe’s, and they were ‘roasted with rosemary.’ The taste blew me away, but more than that… was the texture. These almonds are SO different from the ‘usual’ almonds you and I are used to. They are smaller, more rounded, and more crunchy. Way more crunchy! As in, Macadamia nut crunchy. Marcona almonds come to us from Spain, and are said to be the best almonds ever by all who have tried them. You can get them pretty easily at your local Whole Foods or Trader Joe’s, as well as specialty stores I’m sure. I’ve read about them being roasted or toasted with Thyme, or simply toasted and sprinkled with sea salt… but I could not get over the perfection of the Rosemary roasted ones I tried at work. I bought myself a container of almonds, had Hubby bring me home some fresh Rosemary from work, and got busy. The first thing you do is preheat your oven to 350 degrees. Second, line a heavy duty baking sheet with parchment paper or aluminum foil (mostly for easy clean up). Spread your marconas out over the sheet as evenly as possible.
Next take a generous handful of fresh rosemary and roughly chop it with a sharp knife. Sprinkle it over the almonds, and then drizzle with some olive oil. Lightly toss to coat. sprinkle with salt, and pepper if desired. Place in 350 degree oven, and set timer for 5 minutes. stir/ flip around with a spatula – and continue to roast, checking five minutes later. Stir and flip around once again. Watch them carefully at this point, as they burn easily. I would maybe go another minute, and then remove them to the stovetop. Pour them into a big bowl to cool completely. If you taste them now, while they’re warm, they will feel a bit chewy… this is why you have to let them cool, so they can regain their crunch. continue to toss here and there in the bowl to help cool evenly. Once cooled, serve to guests, hide them in your pantry in an airtight container, eat them all up while you watch ‘Orange is the New Black’… anyway you slice it, they are amazingly addicting. enjoy!!
enter the time of year when we all have a large zucchini sitting on our counter. the days roll by… you look at it… ‘tomorrow morning’ you think… then tomorrow morning you remember you need to be at the dentist for that cleaning you’ve put off. you again exchange glances with said zucchini… ‘cut me up’ he says… ‘prepare me in some fabulous manner’… you promise to meet his requests… ok tomorrow for sure you mumble. finally, two days later, at 2pm, you got rained out at the pool, and the kids are playing nicely in a room across the house… the planets are lining up… ok Mr. zucchini… it’s show time. this soup is the perfect way to turn Mr. Large and in charge into something different and wonderful. think beyond two loaves of zucchini bread for a moment. think even beyond everyone’s new fave, Chocolate Chip zucchini bread… think SOUP. at this time of year, our other bountiful friend is the basil plant. this soup combines the two in an almost effortless manner. this soup manages to be rich and velvety without the addition of cream. even without the addition of chicken broth, amazingly. there are seven ingredients… zucchini, basil, onion, garlic, olive oil, salt and pepper. it can’t get more basic than that. this is kind of the poster child for simple cooking. whole ingredients each taking center stage in the taste. I challenge you when you are eating this to try and taste each ingredient’s flavor one by one. you WILL. I promise. enjoy.
Ze ingredients:
1/4 cup olive oil
one LARGE zucchini (2 pounds or so)
3 garlic cloves
3/4 cup diced onion (I used a Vidalia)
1/2 cup packed Basil leaves (rinse and pat dry or spin)
1 tsp of salt
1/2 tsp of black pepper
3.5 cups of water
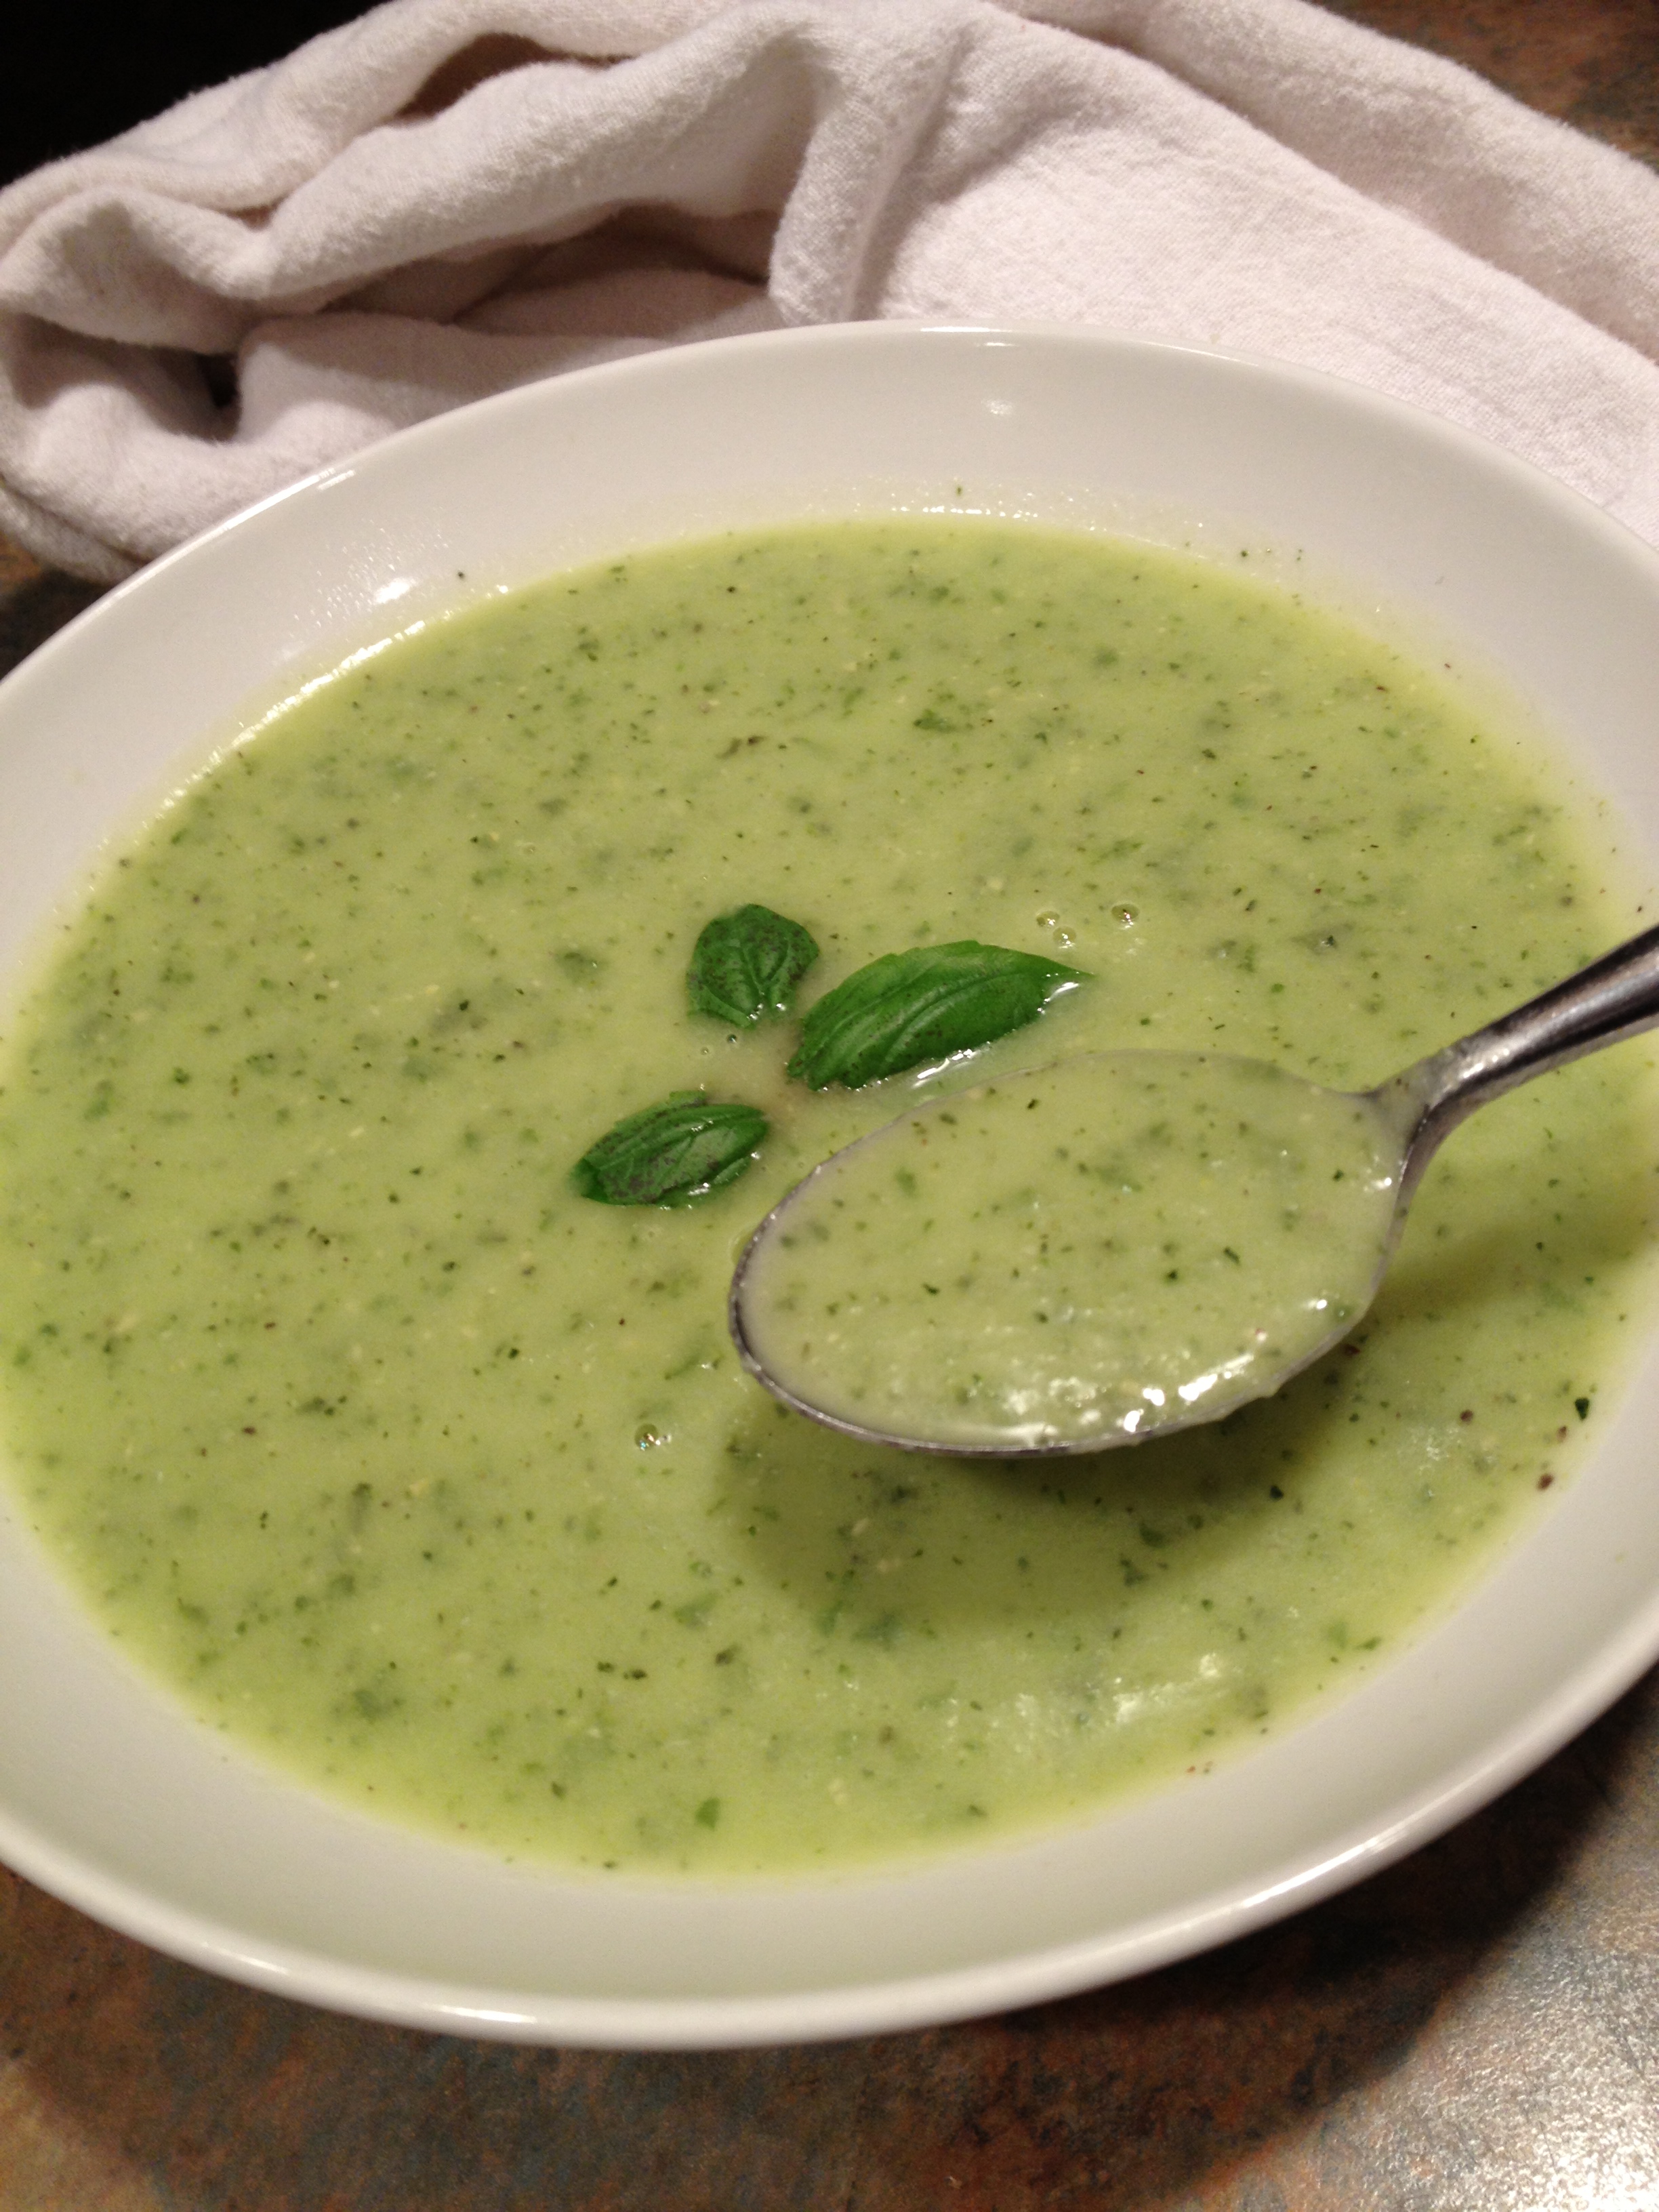
In a large saucepan or dutch oven, add 1/4 cup of olive oil. do not begin heating yet… prep your ingred’s first. lob both ends off of the zuke. cut it in half, lengthwise, and then dice both halves. doing it this way gives you a nice flat bottom on both pieces so it is not rolling around on you. large dice is ok, you will be cooking it and pureeing it at end. set aside. dice your onion and your garlic. prepare your basil, washing and roughly chopping or ripping it up. set aside. ok, turn on the heat, medium high. once warm, add your onions and garlic. sauté for five minutes stirring occasionally. add your zucchini (all of it). sauté five more minutes, stirring occasionally and adding your salt and pepper during this sauté. add you water. bring just to a boil and then reduce heat to simmer. simmer uncovered for 15-17 minutes. lastly, add your basil, stir, and remove from heat. it will look like the picture below at this point. seeds and all… it will all get blended into a lovely healthful lunch or dinner in a few moments.
ready to puree’
taste the broth and adjust with more salt or pepper to your liking. working in two to three batches, carefully add some of this to your blender. ALWAYS USE CAUTION when blending hot liquids. only fill the blender 2/3 of the way full- and hold the lid on tightly with a large damp dishtowel as you blend. (trust me it will blow the lid right off any blender and spray your kitchen in an almost comical manner… I’ve been there.) transfer blended soup to a nice serving bowl or even a Tupperware container. complete until all soup is blended, and serve how you see fit. i personally love it straight up… and love knowing exactly what is in it as I guiltlessly go for a second bowl. enjoy! the picture below is the aftermath… and yes… that is my tongue path licking the bowl. Hey, it was a shallow bowl… it was asking for it.
the homefry. i’ve finally unlocked it. after using several different pans and skillets and oodles of cooking methods, i nailed it. the trick? a large enough cooking surface, plenty of olive oil, and a uniform cut. my favorite potato to use is the yukon gold, hands down. i find it to be the rockstar of all potatoes. it fries up like no other, maintaining its sliced shape all the while. not to mention the skin of the yukon is so paper thin, there’s never any reason in the world to remove it for a homefry. ever. simply wash, dry and slice. the size of your slice is a personal preference. i find a width of 1/4 inch and an overall size of about an inch and half to be ideal to work with. it’s a trial and error game, for sure.
gaining a brown crust
here’s the gameplan: get the largest non stick cooking pan you own. coat bottom with olive oil. (swirl to coat- don’t prep a drowning pool) prepare your potato on cutting board, so that you’re ready when your pan is calling. crank on the heat. high first, and then just below high. add a sprinkle of crushed red pepper flakes. once you see the flakes sweating and dancing, it’s go time. add your potatoes. rearrange them so each and every one has plenty of contact face down in the oil. see visual. now the hard part for us type A’ers… don’t mess with them. this allows the down side to take on a beauteous brown hue, and a heavenly crispness. this crisp side is critical to counteract the softness you’ll achieve at the end. a plate of mush is what you’re trying to avoid at all costs. salt the raw up side generously. check one after about 5 mins with a fork. if you like what you see, take your spatula and flip it upside down in your grip. this is the way you wanna free your lovelies from the skillet. you have to be fast, and apply a downward pressure toward the skillet surface at a 45 degree angle. make attempts to rearrange with brown side upward. dust lightly with garlic powder and a sprinkle of dried parsley or oregano. (no need for pepper, as the red pepper flakes you tricked out your oil with will provide all the heat you need here) obviously there are 50 ways you could flavor your potatoes. i’m giving you the most basic recipe, with flavorings most every reader would have in their kitchen. personally, i love mine with coriander powder, dried oregano, and even a pinch more salt. if it’s summer and i have lots of fresh parsley outside… i’ll chop a bit and rain it down over my plate to finish. ok, back to cooking… cook like this for a few more minutes, and then add a 1/4 cup of water to hot skillet- IMMEDIATELY applying lid to steam them for a bit. reduce heat to medium and allow to cook for 4 minutes or so. stir- check for doneness, cooking a bit longer uncovered if needed. enjoy with your favorite condiment. Heinz ketchup is a natural local partner for us Pittsburghers. -see visual.
so i made this rice a few weeks ago… i can’t recall what our main dish was, but this rice rode alongside it on the plate… and my hubby declared it “my best rice yet.” this made me very happy of course, so i ran to the kitchen and wrote down every step i took to prepare it, while it was all fresh in my mind. as i’ve stated in previous posts, i’m a dump cook, and i do things a little differently every single time. there’s never a ‘recipe’ is the moral of the story. i was able to recall my steps, and got it down in my idea tablet. a week later, i followed my own steps a second time, and to everyone’s delight, it tasted the same!! (novel concept)
Here it is, for all of you to savor as well. it’s an easy rice dish, and takes less then twenty mins from start to finish. perfect with almost anything from baked fish to beef tacos. when you buy the green curry paste, it comes in a small glass jar, and you can keep this stuff for a year in the fridge…. you will love it’s taste, and can use it in other recipes as well. (think chicken soup kicked up with a teaspoon in the pot!!)
ingredients:
1 T olive oil (or canola… whatev)
1 cup long grain white rice (not instant)
3 cloves finely chopped garlic
1 can chicken broth
1/2 tsp of salt
shake of crushed red pepper flakes
1/4 cup water
generous shake of ground coriander
1 tsp of green curry paste (Thai kitchen brand)
large handful of either chopped orange, yellow or red bell pepper- OR a large handful of fresh zucchini cut into bite sized pieces.
Here’s what you do: Add 1 T of oil to a large non stick skillet. heat over hight heat for about 30 secs, then add a cup of long grain white rice. stir around to coat with oil. after about thirty secs, add your chopped garlic. saute, stirring frequently, about two mins. add can of chicken broth, water, salt, shake of red pepper flakes, ground coriander, and tsp of green curry paste. stir to combine. if you are using the bell pepper- add them now. if you are using the zucchini, you are going to add this during last five minutes of cooking time. bring to a boil, and then immediately turn heat to low and cover. set timer for 15 mins. Do not stir until done. (if you are using zucchini as your veg, add it when five mins left on timer, and replace lid. no need to stir) stir lightly at end, check rice for moistness. allow to rest with lid on the skillet while you plate up the other food.
ENJOY!! (no pics this time-i will grab a few with the next preparation.)